

Solve AC issues fast: air conditioning troubleshooting guide UK
TL;DR:
- Most UK homeowners experience air conditioning failures during peak heatwaves, often needing quick troubleshooting. Knowing common issues like filter blockages, refrigerant leaks, or faulty components helps you decide whether to fix it yourself or call a professional. Proper preparation, systematic checks, and regular maintenance prevent many breakdowns and ensure efficient cooling during essential times.
Your air conditioner picks the worst possible moments to stop working. It’s the peak of a July heatwave, guests are arriving in two hours, and suddenly the unit is blowing warm air or making a sound like a bag of marbles in a tumble dryer. Most UK homeowners face exactly this scenario at some point, and the immediate question is always the same: do I call someone out, or can I sort this myself? This guide gives you a practical, step-by-step troubleshooting process built specifically for UK homes, so you can make that decision with confidence rather than panic.
Table of Contents
- Understanding common air conditioning problems
- What you need before you start troubleshooting
- Step-by-step troubleshooting: get your AC back on track
- How to confirm your AC is working properly
- Frequent mistakes and myths about AC troubleshooting
- Our perspective: what most guides miss about air conditioning troubleshooting
- Get expert help or book professional AC services
- Frequently asked questions
Key Takeaways
| Point | Details |
|---|---|
| Diagnose the basics | Most AC issues can be identified by checking filters, thermostats, and power supply first. |
| Safety comes first | Always shut off power and follow guidance before inspecting internal components. |
| Regular maintenance | Prevent most breakdowns by cleaning filters and scheduling maintenance throughout the year. |
| Know your limits | Contact a certified engineer for persistent, electrical, or refrigerant problems. |
Understanding common air conditioning problems
Before you touch anything, knowing what you’re actually dealing with saves a great deal of time and unnecessary expense. Air conditioning faults in UK homes tend to cluster around a handful of recurring issues, and most have straightforward explanations once you know what to look for.
The four most common problems are: the unit not cooling, unusual noises during operation, water leaks, and unpleasant odours coming from the vents. Each symptom points to a different part of the system, and each carries a different level of urgency.
Not cooling troubleshooting is the most frequent call we receive. Common causes of AC units not cooling include incorrect thermostat settings, blocked filters, or refrigerant issues. A unit that runs but fails to cool the room is usually suffering from one of these three things, and two of them you can fix yourself in under ten minutes.
Here’s a quick-reference table to help you match the symptom to its most likely cause and decide how urgently it needs attention.
| Symptom | Typical causes | Urgency level |
|---|---|---|
| Not cooling | Blocked filter, thermostat error, low refrigerant | Medium to high |
| Unusual noise (rattling, grinding) | Loose parts, debris in fan, motor wear | High |
| Water leaking | Blocked condensate drain, frozen evaporator coil | Medium |
| Bad odours | Mould or bacteria in filters/coils, burnt wiring | Medium to high |
| Unit won’t start | Tripped breaker, faulty remote, power supply issue | Low to medium |
A few key points worth noting:
- Dirty filters are behind a surprising number of problems, including poor cooling, strange smells, and even water leaks caused by ice forming on the coil.
- Refrigerant leaks are not a DIY fix. Low refrigerant is a sign of a leak somewhere in the system, and handling refrigerant requires F-Gas certification in the UK.
- Grinding or squealing noises suggest mechanical wear and should not be ignored. Running a unit in this state can turn a minor repair into a full replacement.
- Musty smells are almost always related to mould growth in the internal components, which builds up when filters aren’t cleaned regularly.
Once you know what can go wrong, it’s important to prepare properly before troubleshooting.
What you need before you start troubleshooting
Jumping straight into poking around inside an AC unit without preparation is how small problems become bigger ones. Taking five minutes to gather the right items and follow basic safety steps protects both you and the equipment.
Regular maintenance and safety precautions are essential before handling air conditioning systems. This holds true whether you’re doing a full service or just trying to diagnose a fault.

Here is what you’ll want to have to hand:
| Item | Purpose |
|---|---|
| Flat-head and cross-head screwdrivers | Removing panels and covers |
| Torch or head lamp | Seeing inside dim unit cavities |
| Protective gloves | Avoiding sharp edges and debris |
| Vacuum cleaner with brush attachment | Cleaning filters and coils |
| Clean cloths or paper towels | Wiping down components |
| Notepad and pen | Recording what you find and what you change |
| Unit manual or model number | Identifying error codes and reset procedures |
The residential maintenance checklist we recommend covers each of these items in detail, and the maintenance checklist for UK homes adds specific guidance around the UK climate and seasonal considerations.
Before opening any panels or removing any filters, do the following:
- Switch off the unit at the wall controller or remote.
- Isolate the power at the mains or circuit breaker for that circuit.
- Check for standing water around the indoor or outdoor unit. If there is significant water pooling, do not proceed until it’s cleared and the source is identified.
Safety warning: Always isolate power before opening panels or accessing internal components. Even with the remote off, components inside can retain charge. Never work on a running unit.
Now you’re ready to start. Let’s look at how to troubleshoot step-by-step.
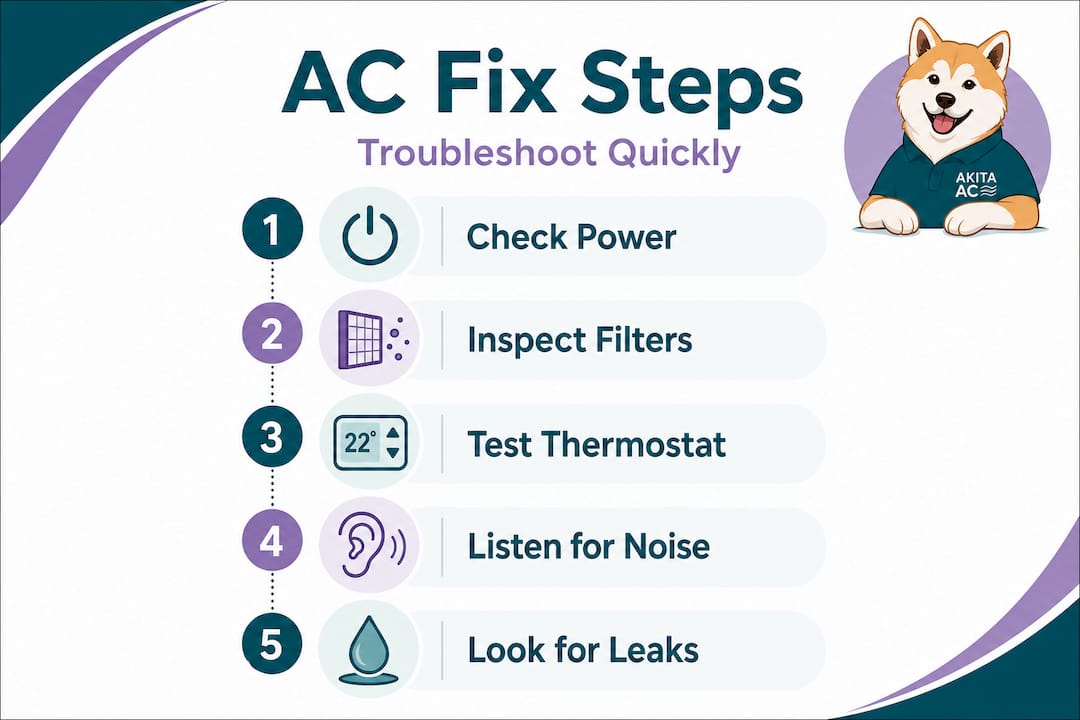
Step-by-step troubleshooting: get your AC back on track
A systematic approach is the difference between solving the problem in twenty minutes and spending two hours going in circles. Follow these steps in order, and you’ll either fix the issue or gather the information a professional needs to fix it quickly.
Steps to resolve common AC faults include checking power, cleaning filters, and resetting the system. Work through each stage methodically, and optimising AC performance often comes down to systematic checks of controls, airflow, and cleaning.
-
Check the power supply. Confirm the unit is receiving power. Check the mains switch, the isolator switch near the outdoor unit, and the circuit breaker in your consumer unit. A tripped breaker is one of the most common and easily overlooked causes of a unit not starting.
-
Check the thermostat settings. Set the temperature at least 3 to 4 degrees below the current room temperature. Make sure the mode is set to cooling, not fan-only or heating. Remote batteries are another thing worth replacing at this stage.
-
Inspect and clean the filter. Remove the front panel of the indoor unit and locate the filter. If it’s visibly grey or blocked with dust, clean it under a tap using lukewarm water and allow it to dry fully before replacing. A blocked filter restricts airflow and causes more problems than almost any other single issue.
-
Check all vents and grilles. Walk around and confirm that no furniture, curtains, or other objects are blocking the indoor unit’s intake or output vents. Restricted airflow causes the system to work harder and cool less effectively.
-
Clear the area around the outdoor unit. Check that leaves, dirt, or vegetation haven’t accumulated against the condenser unit outside. The outdoor unit needs clear space of at least half a metre on all sides to transfer heat effectively.
-
Perform a system reset. Turn the unit off at the mains, wait 30 seconds, then power it back on. Many modern units will clear minor fault codes with a simple reset.
-
Observe the unit for 10 to 15 minutes. After restarting, let the system run and check whether it produces cool air, whether the outdoor unit is running, and whether any error codes appear on the display.
-
Check for error codes. Most modern split systems display a fault code when something specific is wrong. Note the code and cross-reference it with the unit manual. Common codes relate to sensor errors, communication faults, or refrigerant pressure.
Pro Tip: Keep a notepad nearby and jot down everything you change and when. If the problem returns, this record tells you exactly what was already tried and saves repeating the same steps.
When to stop and call a professional. If you notice refrigerant ice forming on the pipes, a persistent water leak, a burning smell, or error codes that don’t clear after a reset, stop. These are signs of faults that require specialist tools and qualifications to fix safely. Attempting to continue beyond this point risks voiding your warranty and may cause further damage.
Following the process will resolve most everyday issues, but how do you know if your fix worked?
How to confirm your AC is working properly
Fixing the obvious fault is satisfying, but confirming the repair held is just as important. A quick verification check prevents you from reassembling everything only to discover the problem persists.
Testing air output and efficiency checks can confirm effective AC repair, and this doesn’t have to be complicated.
Here’s what to look for after carrying out repairs:
- Consistent airflow. Hold your hand near the output vent. Airflow should feel strong and steady, not intermittent or weak.
- Correct temperature output. Use a simple thermometer near the vent. A functioning cooling unit should output air roughly 8 to 12 degrees below the room temperature it’s drawing in.
- No error codes displayed. The unit’s display should show normal operating information, not a flashing fault code.
- Outdoor unit is running. Check that the compressor and fan in the outdoor unit are both operating. If the indoor unit runs but the outdoor unit doesn’t, there’s still a fault present.
- No unusual noises or smells. A clean, well-functioning system should run quietly without any metallic, musty, or burning odours.
If all five of these checks pass, your repair was successful. Run the system for at least an hour and revisit the checks before considering the job done.
Pro Tip: Start an AC logbook. After every repair or service, note the date, what was done, and any observations. Over time, this logbook tells you how your specific unit behaves and makes future troubleshooting significantly faster.
Next, let’s address some persistent myths and mistakes that cause unnecessary frustration.
Frequent mistakes and myths about AC troubleshooting
Even experienced homeowners fall into habits that make AC problems worse. A few straightforward corrections can save you both money and stress.
Common mistakes:
- Not cleaning or replacing filters regularly, which is the leading cause of reduced efficiency and avoidable breakdowns.
- Turning the thermostat to its lowest setting to “speed up” cooling. This doesn’t work and puts unnecessary strain on the compressor.
- Ignoring minor noises or small drips. These are always early warning signs, never background quirks.
- Closing vents in unused rooms, which unbalances pressure in the system and causes wear on components.
- Running the unit in cooling mode when outdoor temperatures drop below around 16°C, which can damage the system in units not designed for low-temperature operation.
Persistent myths:
- “You should always call a professional first.” Not true. Many faults are resolved by checking power, cleaning filters, or performing a reset. Knowing the basics saves you money and time.
- “A bigger unit cools faster.” A unit that’s too large for the room short-cycles, meaning it switches on and off rapidly without completing a full cooling cycle. This actually leaves rooms more humid and uncomfortable.
- “Air conditioning makes you ill.” The unit itself doesn’t cause illness, but poorly maintained filters and coils can circulate allergens and mould spores. Clean filters eliminate this risk.
Ignoring small signs and skipping regular maintenance are leading causes of AC breakdown. Regular AC maintenance is the most reliable protection against unexpected faults.
Caution: Skipping basic checks and ignoring early warning signs significantly increases the risk of permanent damage to compressors and heat exchangers, components that are expensive to replace and not always covered under standard warranties.
Armed with these facts, here’s our perspective from years in the industry.
Our perspective: what most guides miss about air conditioning troubleshooting
Most troubleshooting guides written for AC systems are adapted from American or Australian sources. They’re designed for climates where air conditioning runs almost continuously, and they assume infrastructure like 240V single-phase supply without actually checking whether the guidance fits UK wiring conventions and usage patterns.
The honest truth, in our experience, is that the vast majority of AC faults we’re called out to attend could have been avoided entirely. Not through expensive servicing contracts or elaborate preventative measures, but through genuinely basic habits: cleaning the filter once a month during summer, clearing leaves from the outdoor unit in autumn, and running the unit in heating mode for a few hours in early spring to check it before the warm weather arrives.
The reactive approach to air conditioning is deeply ingrained in UK culture because most homes only installed systems in the last decade or so. There’s no long-standing habit of seasonal AC care the way there is for boiler servicing. That gap in routine is where almost all the problems we attend originate.
Upgrading AC efficiency is often framed as a major project, but the truth is that a well-maintained system installed five years ago will outperform a brand-new system that’s already neglected. The hardware matters less than the habit.
Our practical recommendation: block out 30 minutes in late April each year. Run your AC, clean the filter, check the outdoor unit, and note anything unusual. Do it before the first heatwave, not during it, and you’ll avoid the panic entirely.
Get expert help or book professional AC services
If your troubleshooting has confirmed you need professional support, or if you’d rather have a qualified engineer handle the diagnosis, Akita Air Conditioning is here to help.
We provide professional installation, servicing, and repair for homeowners and property managers across Essex, including professional AC installation in Clacton-on-Sea and the surrounding areas. Our accredited engineers carry out thorough diagnostics, handle refrigerant safely under F-Gas regulations, and give you clear, transparent pricing before any work begins. Whether you need a one-off repair, a seasonal service, or are thinking about upgrading to a more energy-efficient system, Akita AC makes the process straightforward from start to finish.
Frequently asked questions
What is the first thing to check if my air conditioner won’t start?
Check that your unit is plugged in, switched on at the mains, and the circuit breaker hasn’t tripped, as power supply issues account for a significant portion of common AC faults that appear serious but are simple to resolve.
How often should I clean my AC filters in the UK?
Clean or replace AC filters every one to three months, and more frequently during summer. Skipping regular maintenance is one of the primary causes of avoidable breakdowns.
When should I contact a professional for AC problems?
Call a professional if you notice persistent leaks, electrical faults, or unusual noises that continue after basic checks, as refrigerant and thermostat issues require qualified engineers to diagnose and fix safely.
Does regular AC maintenance help prevent future breakdowns?
Yes, routine maintenance is the most effective way to prevent unexpected AC failures. Essential safety precautions and regular servicing extend the lifespan of your system considerably and keep energy bills lower throughout the year.