

How to prepare for AC installation: UK stress-free guide
TL;DR:
- Proper preparation before air conditioning installation includes planning unit placement, ensuring electrical capacity, and confirming wall access to avoid delays and extra costs. Homeowners should verify legal requirements, such as permitted development rights and building regulations, especially in conservation or listed areas, before booking installation. On installation day, clear the workspace and confirm compliance details to ensure a smooth process with certified professionals handling all technical and legal aspects.
Getting air conditioning installed sounds straightforward until the engineer arrives and nothing is ready. Walls need clearing, electrical supplies turn out to be inadequate, or the property sits in a conservation area that nobody checked. These oversights can stall a project by weeks, add hundreds of pounds in remedial costs, or create legal headaches that halt work entirely. This guide walks you through every preparation stage, from pre-booking checks and legal compliance to what happens on installation day, so your AC project runs smoothly from the first call to the final sign-off.
Table of Contents
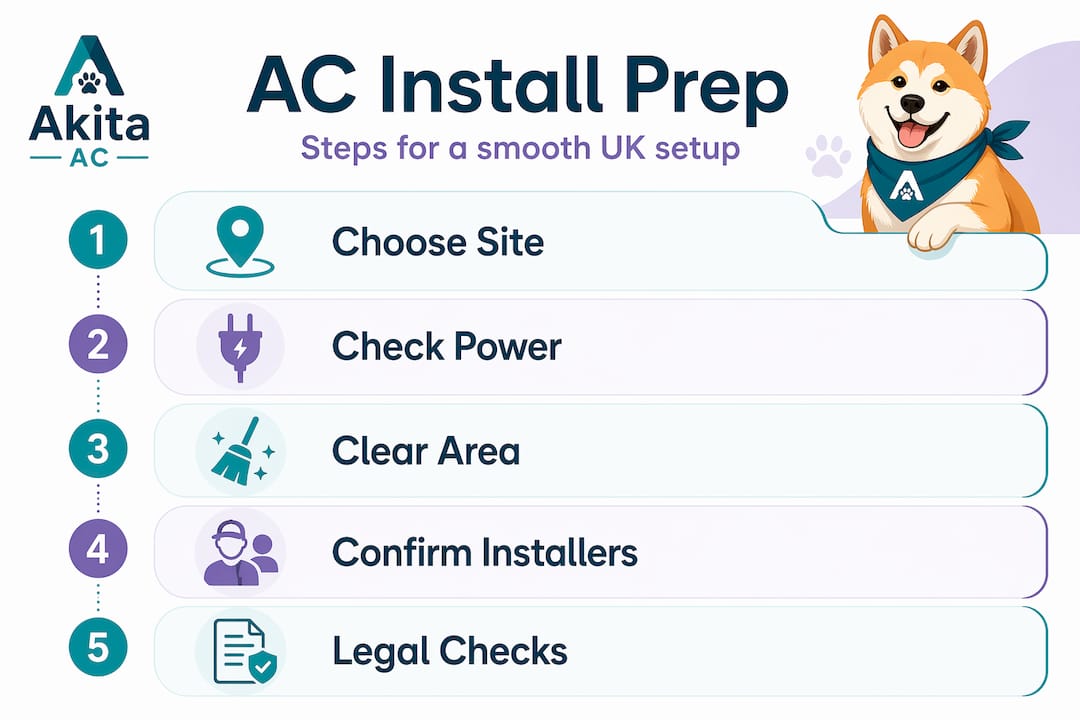
- What to check before booking AC installation
- Step-by-step guide: preparing your space
- Legal and compliance checks: avoiding costly mistakes
- What to expect on installation day
- The hidden pitfalls of AC installation prep UK homeowners overlook
- Next steps: get expert AC installation support
- Frequently asked questions
Key Takeaways
| Point | Details |
|---|---|
| Site preparation essentials | Plan indoor and outdoor unit locations, clear access, and check electrical supply before installation day. |
| Legal compliance matters | Verify if planning permission or Listed Building Consent is required before you order or start work. |
| Wall drilling is standard | Expect a core drill (60–70mm) for split systems to accommodate pipework and drainage. |
| Certified commissioning required | A certified F-Gas engineer must complete UK AC systems for safety and legal compliance. |
| Document everything | Request commissioning records and check your engineer’s credentials to protect your warranty and compliance. |
What to check before booking AC installation
Preparation is not something you do the morning the engineer rings your doorbell. It starts the moment you decide to get air conditioning. The biggest causes of installation delays in the UK are poor unit placement planning, insufficient electrical supply, and inadequate access for the installer’s equipment. Sorting these in advance removes almost every avoidable problem.
Indoor and outdoor unit placement is the foundation of a good install. The indoor unit needs a clear wall with enough height above obstructions, away from direct sunlight and heat sources that would skew the thermostat reading. The outdoor unit needs a solid, level surface (or a suitable wall bracket), adequate clearance around it for airflow, and a location that does not violate noise regulations near neighbours or boundary rules. A common mistake is choosing the outdoor location for cosmetic reasons alone, which then creates airflow restrictions and forces the system to work harder than necessary. Good energy efficiency preparation starts at placement, not after the unit is running.
Electrical supply is the point where most homeowners are caught off guard. Standard split systems up to around 3.5kW can often run from an existing ring main, but larger units and multi-split systems almost always need a dedicated supply circuit. Before the engineer arrives, practical prep includes deciding the best indoor and outdoor locations and ensuring electrical suitability, as for some systems a dedicated supply may be needed. Have a qualified electrician assess your consumer unit before booking the AC install, not after. That single step can save you from rescheduling.
Pro Tip: When planning your electrical supply, size it for the next unit up from what you currently intend to install. Upgrading a dedicated circuit later costs significantly more than specifying it correctly the first time. Solid cost-saving preparation means thinking ahead.
Pre-installation checklist
Here is a quick summary of what to confirm before you book:
- Confirm indoor unit wall location: clear, structurally sound, no hidden pipework or cables
- Confirm outdoor unit position: level, ventilated, at least 300mm clearance on all sides
- Check consumer unit capacity and whether a dedicated circuit is needed
- Measure pipe run distance between indoor and outdoor units (longer runs affect system performance)
- Confirm access for drilling and cable runs through walls and ceilings
- Remove furniture, shelving, or curtains near the installation zone
- Check loft or ceiling void access if pipework is routed internally
| Prerequisite | Split system | Multi-split system |
|---|---|---|
| Dedicated electrical circuit | Sometimes needed | Almost always needed |
| Outdoor unit clearance | 300mm minimum | 500mm+ recommended |
| Wall drilling required | Yes (one run) | Yes (multiple runs) |
| Pipe run limit | Typically 15m | Varies by unit; check spec |
| F-Gas engineer required | Yes | Yes |
| Structural wall check | Recommended | Essential |
Step-by-step guide: preparing your space
With the prerequisites confirmed, physical preparation of the space is your next task. A well-prepared site means the engineer spends time installing, not problem-solving.
-
Clear the indoor installation zone. Remove furniture, wall art, shelving, and anything within two metres of the planned unit location. Give the engineer at least one metre of clear floor space below and around the wall area. Dust sheets are a thoughtful touch as drilling produces debris.
-
Prepare the outdoor route. Walk the planned pipe route from indoors to outdoors and identify any obstacles: fixed shelving, utility cupboards, or awkward ceiling voids. If the route goes through a loft, clear a path and ensure the loft hatch is accessible.
-
Identify the wall type for drilling. This matters more than most people realise. Expect a core-drilling operation through external walls for split systems, commonly around 60 to 70mm in diameter in UK installs, often angled slightly to aid condensate drainage. Solid brick or stone walls take longer and create more dust than cavity or timber-frame walls. Knowing your wall type lets you plan realistically.
-
Arrange access. If the outdoor unit mounts on an upper-floor bracket or flat roof, confirm whether scaffolding or specialist access equipment is needed. This is the installer’s call, but flagging it early avoids day-of surprises.
-
Protect sensitive equipment. If the installation area is near IT equipment, musical instruments, or anything sensitive to dust, cover it well in advance. Fine concrete dust from core drilling travels further than you expect.
Pro Tip: Tell your installer the wall construction type before they arrive. Timber-frame, cavity, solid stone, and insulated render all behave differently under a core drill. A brief conversation saves the engineer rocking up with the wrong bit for the job.
| Wall type | Drilling difficulty | Typical time per hole | Dust level |
|---|---|---|---|
| Plasterboard stud | Low | 10 to 15 minutes | Low |
| Cavity brick | Medium | 20 to 30 minutes | Medium |
| Solid brick | Medium to high | 30 to 45 minutes | High |
| Stone or rubble | High | 45 to 60 minutes | Very high |
| Insulated render (ETIC) | Variable | 30 to 50 minutes | Medium to high |
The professional installation benefits of hiring an experienced team are clearest at this stage. They bring the right tools, handle complications without delay, and protect your property far better than an unqualified fitter. After installation, applying a few AC efficiency tips will help maintain performance throughout the year.
Legal and compliance checks: avoiding costly mistakes
Physical preparation without legal preparation is only half the job. Many UK homeowners book an installation, pay a deposit, and only then discover their property falls into a category that needs additional consent. That sequence is expensive to unwind.

Permitted development rights cover most standard domestic AC installations in England, meaning you do not need formal planning permission. However, this is not universal. Properties in conservation areas, Areas of Outstanding Natural Beauty (AONB), and World Heritage Sites face restrictions on what is visible from the public highway. If the outdoor unit would be visible from the street in these zones, you may need to apply for consent before work begins. Check when approval is needed for your specific property type.
Listed buildings are a separate matter entirely. The rules here are strict and non-negotiable.
“If you need to install in a listed building, you should plan for Listed Building Consent because works affecting the building’s character require consent under the Planning (Listed Buildings and Conservation Areas) Act 1990.”
Proceeding without Listed Building Consent is a criminal offence, not merely a planning breach. The consequence can include enforcement notices requiring you to undo the work at your own cost. Check your property’s listing status with your local planning authority before ordering any equipment. Your local installation requirements may vary depending on whether you are in Suffolk, Norfolk, or Essex.
Here are the compliance checks to complete before booking:
- Confirm your property is not listed (Grade I, II*, or II) via the Historic England register
- Check whether your street or area is designated as a conservation area
- Confirm permitted development rights apply to your specific property
- Verify your installer holds a valid F-Gas certification (legally required to handle refrigerants in the UK)
- Ask whether Building Regulations notification is required (relevant for some commercial premises)
- Obtain any leaseholder or management company approval if you are in a flat or managed building
The F-Gas engineer check is one that is consistently overlooked. Refrigerant handling in the UK is regulated under UK F-Gas legislation, and only registered engineers can legally charge, discharge, or recover refrigerant. Ask to see credentials before work begins, not after.
What to expect on installation day
If you have completed your preparation, installation day should be smooth and relatively predictable. Understanding the sequence of work helps you support the process and catch anything that needs your attention.
-
Site survey on arrival. A good engineer will confirm unit positions and pipe routes match what was agreed. If anything has changed, discuss it now, not mid-install.
-
Mounting the indoor unit bracket. The bracket goes up first, levelled carefully. This is load-bearing, so the installer will confirm the wall can support the unit weight.
-
Core drilling. The hole through the external wall is made, typically at a slight downward angle toward the outside to allow condensate to drain naturally.
-
Running refrigerant pipework and electrical cables. These are routed through the core hole and along the agreed pipe run to the outdoor unit. Insulated lagging covers the pipes.
-
Mounting and connecting the outdoor unit. The condenser is fixed to its base or bracket, and refrigerant lines, electrical supply, and drain connections are made.
-
Vacuuming the system. A certified F-Gas engineer must vacuum the refrigerant circuit before charging. This step removes moisture and air from the pipework, which is essential for system longevity and legal compliance.
-
Commissioning and testing. The system is powered up, refrigerant levels checked, and all modes tested. You should see heating, cooling, fan-only, and any smart controls demonstrated.
Pro Tip: Ask the engineer to hand you the commissioning sheet before they leave. This document records refrigerant quantities, test results, and engineer certification details. You will need it for warranty claims and any future servicing. Follow up with the residential maintenance checklist to protect your investment from day one.
| Engineer action | What you should verify |
|---|---|
| Indoor bracket mounted | Level and secure, no wall damage |
| Core hole drilled | Sealed with filler around pipework |
| Pipework lagged and tidy | Neat run, no kinks in refrigerant lines |
| Outdoor unit secured | Stable, not vibrating when running |
| System vacuumed | Engineer confirms vacuum held |
| All modes tested | Cooling, heating, fan, and timer all work |
| Commissioning sheet provided | Contains F-Gas cert number and refrigerant data |
Reviewing the professional cost-saving facts around certified installation makes it clear why shortcuts here are not worth the risk.
The hidden pitfalls of AC installation prep UK homeowners overlook
After years of supporting AC installations across Suffolk, Norfolk, and Essex, the mistakes we see most often are not from people who skipped preparation entirely. They are from people who prepared carefully but made one assumption that turned out to be wrong.
The most expensive assumption is that your property does not have any special designation. Planning and permitted development assumptions fail for protected categories, including listed buildings and conservation areas, so confirming your property status before ordering equipment is essential to avoid project-stopping consent work. We have seen customers purchase equipment, arrange installation dates, and then discover mid-project that their Victorian terrace falls inside a conservation area boundary that is not immediately obvious on a street map.
The second most common pitfall is skipping the pre-installation electrical assessment. Discovering that your consumer unit cannot support the new system on installation day means rescheduling both the electrician and the AC engineer. That is two separate call-out charges plus the frustration of a delayed installation.
A subtler trap is choosing the cheapest installation quote without checking engineer credentials. An uncertified installer who handles refrigerant without F-Gas registration is breaking the law. If that comes to light during a future service or insurance claim, it can invalidate your warranty and leave you liable for rectification costs.
The most effective way to avoid all of these is to request a pre-site visit from your installer. Not a phone conversation, an actual visit. An experienced engineer will spot electrical limitations, access issues, wall construction surprises, and planning red flags in thirty minutes that could save you thousands. Follow up any installation with a structured approach to ongoing maintenance and your system will reward you with years of efficient, trouble-free performance.
Next steps: get expert AC installation support
Preparation becomes far simpler when you have an experienced team guiding you through it. At Akita Air Conditioning, we handle the technical and compliance questions so you do not have to work through them alone.

Whether you are looking at domestic AC installation for your home or a full commercial AC installation for your business, our certified engineers manage everything from the initial site assessment to F-Gas commissioning and handover paperwork. For homeowners ready to move forward, our fixed-price AC install packages offer transparent costs with no hidden charges, flexible finance options, and the peace of mind that comes from fully certified, warranty-backed work. Get in touch today and take the stress out of preparation entirely.
Frequently asked questions
Do I need planning permission for home AC installation in the UK?
Most standard domestic installs fall under permitted development rights and do not require formal planning permission, but listed buildings and conservation areas may require Listed Building Consent or other special consent before work begins.
What checks should I do before the AC engineer arrives?
Clear the installation areas, confirm your power supply is suitable for the system size, and agree final indoor and outdoor unit positions with the installer. Practical preparation also includes checking whether a dedicated electrical circuit is needed to avoid rescheduling on the day.
Why does AC installation require wall drilling?
Split AC systems route refrigerant pipework and condensate drainage between the indoor and outdoor units through the external wall. A core hole of around 60 to 70mm is drilled, usually at a slight downward angle toward the outside to help condensate water drain away naturally.
Who can legally commission my AC system in the UK?
Only a certified F-Gas engineer can legally handle refrigerant, perform the final connection, and commission a split system. UK F-Gas regulations require this for safety and environmental compliance, so always check credentials before work starts.
What paperwork should I ask for after installation?
Request the commissioning sheet, which records refrigerant quantities, system test results, and the engineer’s F-Gas certification details. Keep this document safe as you will need it for warranty claims and future servicing appointments.