

Fix moisture behind mould around air vents, for homeowners
Mould around an air vent almost always points to a moisture problem, whether that’s condensation on a cold register, a hidden duct leak, or humid indoor air with nowhere to go. Cut off the moisture source first, then clean the visible growth. If patches cover more than a small area, keep vulnerable household members away from the room and book a professional inspection rather than scrubbing and hoping.
TL;DR:
- Moisture sources such as leaks, condensation, or high indoor humidity are the primary causes of mould around air vents and must be addressed before cleaning.
- Visible mould often has a fuzzy or speckled appearance, a persistent musty smell, and smears when wiped, indicating deeper contamination that may require professional removal.
- Small patches can be cleaned with household disinfectants, but widespread, recurring, or deeply embedded mould needs expert intervention to prevent health risks.
- Maintaining ideal indoor humidity, fixing insulation gaps, and ensuring proper ventilation are key steps to prevent future mould growth around vents.
- Contaminated ductwork with porous materials or extensive areas of mould typically requires replacement rather than cleaning to fully eliminate health hazards.
Table of Contents
- What causes mould around air vents
- How to tell mould from dust around your vents
- Health risks of mould exposure from vents
- How to remove mould around vents safely
- When to call a professional for vent mould
- Preventing mould around air vents for good
- Why Akita takes vent mould seriously
- How long does mould remediation take, and what does it cost?
- How to detect hidden mould inside ductwork
- Inspecting and cleaning ductwork and vents properly
- When to replace contaminated duct components instead of cleaning them
- How vent mould affects the air you breathe indoors
- Fix the source, not just the symptom
- Sources
- FAQ
What causes mould around air vents
Mould needs moisture, and vents are magnets for it. When cool air blows out of a supply register into a warmer, humid room, the metal grille and surrounding wall can drop below the dew point, exactly like condensation on a cold drink. That thin film of moisture is enough to feed mould spores that are already floating in every home’s air, as the EPA’s mould training material explains.
Several everyday habits make this worse:
- Showers, cooking, and drying laundry indoors without extraction push humidity up fast, especially in smaller or older properties.
- Leaking or poorly insulated ductwork lets warm, moist air meet cold metal inside walls or ceilings, out of sight.
- Gaps in the building fabric, such as around window reveals or loft hatches, let humid air track towards vents and cold spots.
- Blocked, painted-over, or permanently closed background vents trap moisture that would otherwise escape.
Weather plays a role too. Homes in regions with a prolonged wet or humid season see a seasonal spike in condensation risk, according to NOAA’s seasonal weather data, which is worth bearing in mind if the mould reappears at the same time every year.
How to tell mould from dust around your vents
Dust looks dry, sits evenly, and wipes away in one pass. Mould tends to look fuzzy, speckled, or has a raised texture, and it often reappears within days of cleaning because the spores are still there and the moisture never left.
A quick three-step check tells you which one you’re dealing with:
- Look closely. Black mould on vents typically shows as dark speckling or a felt-like patch around the grille edges, not a uniform grey film.
- Smell it. A persistent musty odour near the vent, especially when the air conditioning kicks in, suggests mould is growing somewhere air passes over it, not just on the visible surface.
- Wipe a small area. If it smears into a dark streak rather than lifting away as powder, treat it as mould until proven otherwise.
Unclipping the grille (most simply unscrew or pop off) lets you check the first few centimetres of duct. Growth that extends past what you can see, or a smell that’s stronger inside the duct than on the grille itself, are signs the contamination goes deeper than a surface wipe will fix.
Pro Tip: Take a torch and a phone photo before you clean anything. It gives you a baseline to compare against if the mould comes back, and it’s useful evidence if you end up calling a professional.
Health risks of mould exposure from vents
Mould exposure from an air vent is more concerning than mould on a bathroom tile, because the HVAC system can circulate spores through every room it serves rather than keeping them in one spot. The EPA notes that mould commonly causes nasal congestion, throat irritation, coughing, and eye irritation, and that these effects tend to be worse for people with asthma or a weakened immune system.
The CDC’s guidance on mould reinforces the same point from a public health angle: moisture control is the primary defence, and removing mouldy material reduces exposure for everyone in the household, not just the person who reacts most visibly.
Both agencies agree on the threshold that matters most for vent-related mould: if symptoms flare specifically when the AC or heating runs, and ease when it’s off, the vents are a likely source and it’s worth treating as urgent rather than cosmetic.
Children, older adults, pregnant women, and anyone with existing respiratory conditions are the groups most likely to notice symptoms first. If someone in the home falls into one of those categories, don’t wait for the mould to spread before acting. For more on how HVAC air quality affects a household day to day, see this piece on why indoor air quality matters for your family’s health.
How to remove mould around vents safely
Small, surface-level mould on a vent is a manageable DIY job. The EPA is clear that household cleaners work fine for limited patches, but anything larger, recurring, or linked to water damage needs a professional.
Before you touch anything:
- Put on gloves, an N95 mask, and eye protection. Mould spores are the whole problem here, and disturbing dry growth throws them into the air you’re trying to protect.
- Turn off the HVAC system for that zone so spores don’t get pulled through the ducts while you work.
- Open a window if you can, and lay down an old sheet or plastic to catch debris.
To clean a removable grille, take it off, soak it in warm water with a mild detergent, scrub with a soft brush, rinse thoroughly, and let it dry completely before refitting. Damp reinstallation just restarts the growth cycle. For the wall or ceiling surface around the vent, wipe with detergent and water rather than scrubbing dry, which sends spores airborne instead of lifting them off.
A few things to avoid:
- Don’t dry-brush mouldy surfaces; always dampen first.
- Skip the bleach-and-ammonia mixing myths circulating online. These combinations produce toxic fumes and add no real cleaning benefit over a simple detergent.
- Don’t scrub porous materials like drywall or insulation. Once mould gets into a porous surface, cleaning the top layer rarely solves it.
Pro Tip: If you’re cleaning filters as part of the same job, a step-by-step guide on cleaning air conditioning filters safely will stop you accidentally reintroducing moisture during the process.
Stop and call a professional if the patch is bigger than roughly A4 size, keeps coming back after cleaning, or if anyone vulnerable lives in the property.
When to call a professional for vent mould
Some situations are beyond a weekend fix. Contamination spread across more than about a square metre, a musty smell that fills the whole house rather than one room, or mould you suspect is hidden inside the ductwork itself all call for an inspection rather than another round of wiping.
A professional visit typically includes:
- A full inspection of accessible ductwork, registers, and the areas around them for hidden growth.
- Containment measures to stop spores spreading to unaffected rooms during the work.
- Targeted removal of contaminated material, followed by a check for the leak, condensation point, or ventilation gap that caused it in the first place.
- A look at whether any duct sections or insulation need repair or replacement rather than cleaning.
Cost and time depend heavily on access (ducts behind plasterboard cost more to reach than ones in a loft), how much material needs replacing, and whether redecoration follows the repair. If you’re also noticing weaker airflow or odd noises from the system, that’s often a sign of a related fault. Our guide on signs you need HVAC repair covers what to look out for alongside the mould itself.
Preventing mould around air vents for good
Cleaning without fixing the moisture source just buys you a few weeks before the mould returns. The EPA’s own guidance frames mould control as moisture control first, and that’s the mindset worth adopting here.
Start with aiming to keep indoor relative humidity within a recommended moderate range to reduce mould risk. A simple, inexpensive hygrometer can help you monitor humidity.
From there, prioritise in this order:
- Run extractor fans in bathrooms and kitchens every time you shower or cook, and leave them on for a few minutes afterwards.
- Keep trickle vents open, even in winter. Blocking them to stop draughts is a common mistake that traps moisture instead of removing it.
- Dry laundry outside or in a vented tumble dryer rather than on indoor racks.
- Insulate ductwork that runs through cold spaces such as lofts or garages to stop condensation forming inside the duct itself.
- Change HVAC filters on schedule. Clean filters improve airflow and cut condensation risk, a point Energy backs directly.
Pro Tip: Move furniture a few centimetres off external walls. Cold walls plus trapped air behind a sofa is one of the most overlooked mould triggers in UK and US homes alike.
If your rooms run consistently damp despite good ventilation, a dehumidifier or a humidity-controlled ventilation system earns its cost back quickly in avoided mould treatment.
Why Akita takes vent mould seriously
Condensation-driven mould around vents is a common fault found during routine servicing of air conditioning and climate control systems. Poor insulation, ageing ducts, and clogged filters all show up repeatedly in that work.
For related reading, see how HVAC systems affect indoor air quality and how to improve air quality at home more broadly.
How long does mould remediation take, and what does it cost?
A single vent with a coin-sized patch is a same-day job: an hour or two of cleaning, drying, and refitting. Widespread contamination is a different scale of problem entirely.
Professional remediation for a moderate case, one or two rooms with duct involvement, typically runs from a few days to a week once you factor in containment setup, removal, drying time, and any repairs to insulation or ductwork. Extensive cases involving multiple rooms, hidden growth behind walls, or full duct sections needing replacement can stretch to two or three weeks, particularly if redecoration follows the structural work.
Cost drivers follow a predictable pattern. Access is the biggest one: ductwork buried behind plasterboard or in a tight loft space costs more to reach and repair than an exposed run. The extent of contamination matters just as much, since a single register is a fraction of the cost of a whole-system clean. Material replacement, insulation, sections of ducting, or damaged drywall, adds to the bill faster than the mould removal itself does. Finally, whether the job includes redecoration (repainting, replastering) or stops at remediation changes the final invoice significantly.
One thing worth knowing before you get quotes: the EPA’s guidance on duct cleaning explicitly states that routine duct cleaning is often unnecessary unless there’s visible mould, vermin, or heavy debris. A reputable contractor should inspect first and quote based on what they actually find, not sell you a full-system service by default. If a quote jumps straight to whole-house duct cleaning without an inspection, ask why.
How to detect hidden mould inside ductwork
Mould inside ducts doesn’t always announce itself with visible spotting. Often the first clue is a smell that’s stronger when the system runs and fades when it’s off, which tells you the source is somewhere air actually passes through rather than a static surface.
A few practical detection methods work without cutting into ductwork:
Check the return air grille and supply registers throughout the house, not just the one that first caught your attention. Mould near one vent often means condensation conditions exist at others too, even if growth hasn’t shown yet.
Look at the drain pan and condensate line if you have a central air conditioning unit. A blocked or slow-draining pan sits full of water for days, and that stagnant moisture is a common hidden source that never touches a vent directly but still spreads its smell through the duct system.
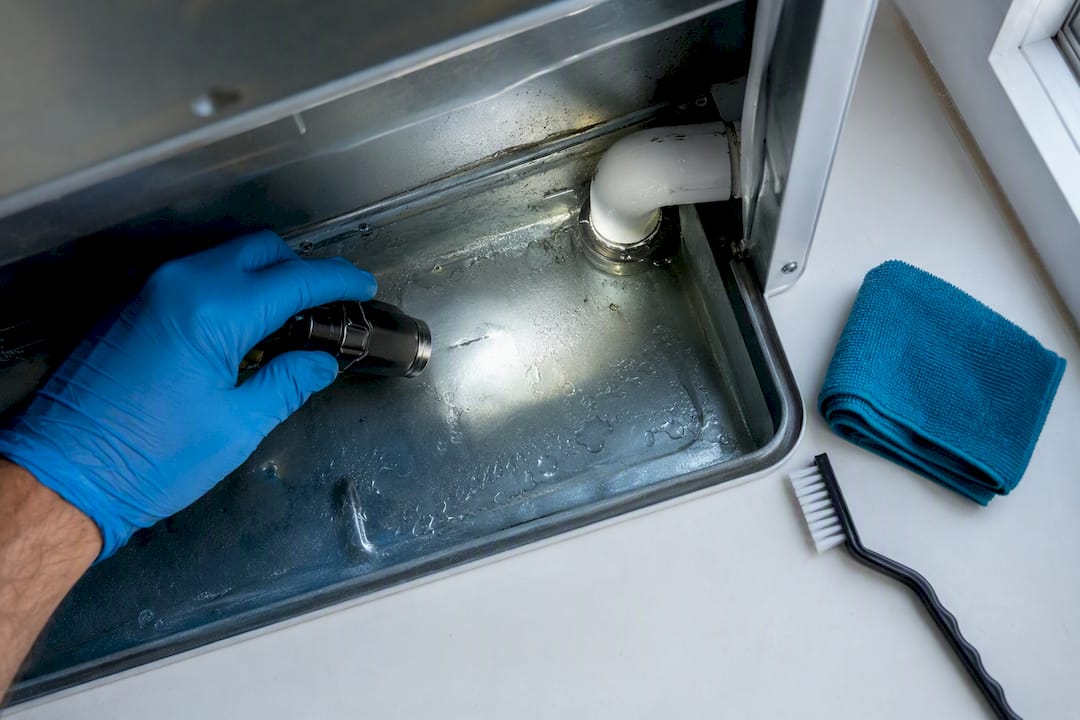
Watch for staining. Water marks on ceiling tiles, drywall seams following a duct run, or discolouration around register frames often reveal a leak point long before mould becomes visible on the surface.
If none of that pins it down but the smell persists, a professional inspection using a borescope camera can examine inside duct runs without demolishing anything. This is exactly the situation where DIY guesswork stops being worth the risk, particularly if anyone in the home has asthma or a compromised immune system, as the EPA’s health guidance flags as a higher-risk group.
Inspecting and cleaning ductwork and vents properly
Start every inspection at the vents themselves, since they’re the easiest access point and often show the first visible signs of a wider problem. Remove each grille, check the metal for moisture beading or rust (a sign condensation is a recurring issue there), and inspect as far into the duct mouth as your arm and a torch will reach.
Work room by room rather than assuming one bad vent means the whole system is affected. Some rooms run colder or damper than others depending on orientation, insulation, and how much moisture-generating activity happens there, so a kitchen extractor duct and a bedroom supply vent can have completely different conditions.
For the cleaning itself, stick to the same principles as spot cleaning: dampen before wiping, never dry-brush, and let every component dry fully before reassembly. A grille refitted while still damp gives mould a head start rather than a clean slate.
Main supply and return ducts, the larger metal or flexible tubes running through lofts, cavities, or under floors, are not a DIY cleaning job in the way a grille is. Reaching inside them properly requires specialist brushes and negative-pressure equipment to stop dislodged spores simply blowing further down the system. This is the point where the EPA’s position on duct cleaning is most relevant: clean the ducts themselves only when inspection confirms it’s needed, not as a precaution.
Filters sit in the middle ground. Regular filter changes are firmly a homeowner task and one of the most effective, according to Energy.gov’s maintenance advice, yet they’re skipped constantly. A clogged filter forces the system to work harder and often runs colder than it should, which pushes more condensation onto nearby surfaces.
When to replace contaminated duct components instead of cleaning them
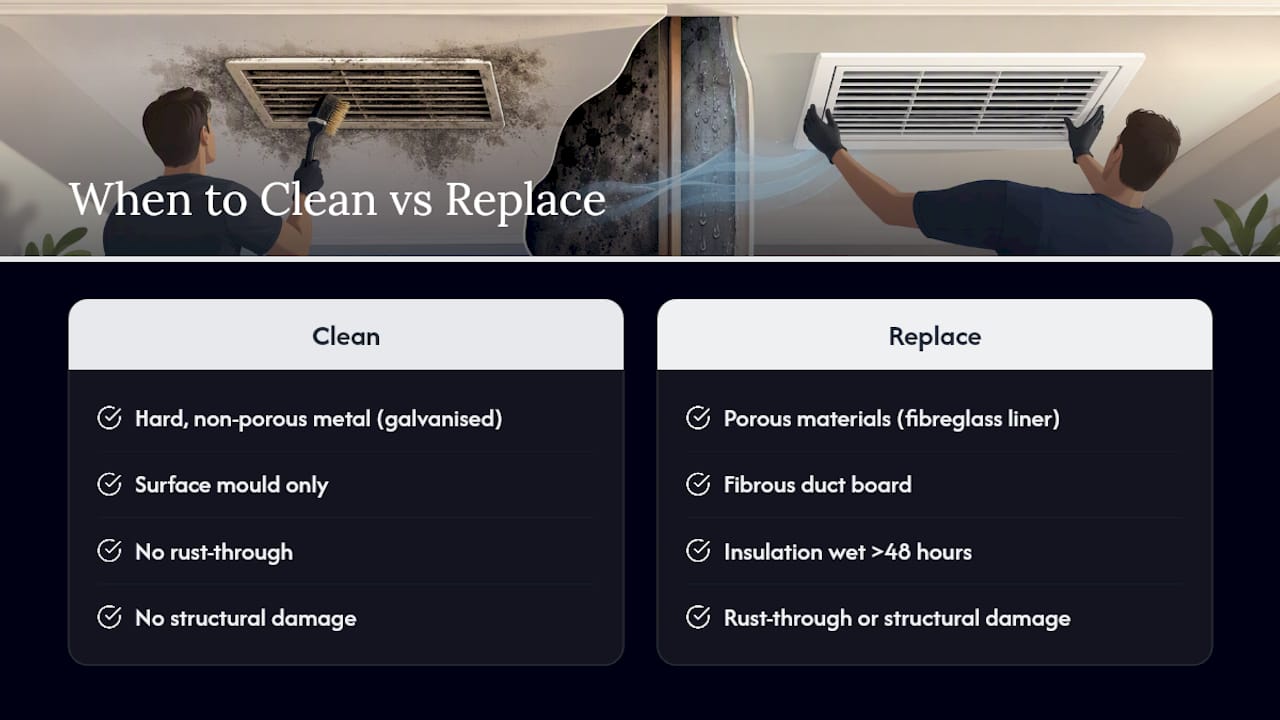
Cleaning works on hard, non-porous surfaces like sheet metal ductwork. It does not work reliably on porous materials, and that distinction decides whether a section gets cleaned or torn out.
Flexible ducting with an internal fibreglass liner, fibrous duct board, and any insulation that’s been sitting in moisture for more than 48 hours are all candidates for replacement rather than cleaning. Mould that’s colonised a porous material typically extends below the surface you can see, so wiping the visible layer leaves the problem intact underneath.
Metal ductwork is more forgiving. A galvanised steel duct with surface mould, no rust-through, and no structural damage can usually be cleaned and treated rather than replaced, provided the moisture source causing the growth gets fixed at the same time. Replacement without fixing the underlying leak or condensation point just delays a repeat of the same failure.
Signs that point towards replacement over cleaning include a strong, persistent odour that survives cleaning attempts, visible crumbling or water damage to duct insulation, and any section where mould has recurred more than once despite proper cleaning. If a remediation contractor recommends replacing a duct run, ask specifically what evidence led to that call, whether it’s visible porous contamination, structural damage, or repeated recurrence, so you understand what you’re paying for.
How vent mould affects the air you breathe indoors
An HVAC system is designed to move air efficiently through every connected room, which is exactly why mould in that system is a different category of problem to mould in a shower corner. Spores don’t stay near the vent; the same airflow that heats or cools your home also carries them into bedrooms, living rooms, and anywhere else the ductwork reaches.
This is where the health guidance and the air quality picture overlap directly. The CDC’s mould guidance points to moisture control as the core prevention strategy precisely because mould that’s established itself keeps releasing spores as long as conditions stay damp, regardless of how often you clean the visible surface.
Households sometimes notice a general decline in air quality, more dust settling, a persistent staleness, before they connect it specifically to mould near a vent. That’s a reasonable pattern: reduced airflow from a partially blocked or contaminated vent changes how air circulates throughout the property, not just in the room where the mould is visible.
The practical upshot is that treating vent mould isn’t purely cosmetic maintenance. It’s an air quality intervention that affects every room the system serves, which is also why source control (fixing the humidity, leak, or insulation gap) matters more here than in almost any other spot in the house.
Fix the source, not just the symptom
Mould around a vent is rarely the actual problem. It’s the visible symptom of a moisture issue that’s usually been building for weeks. Cleaning the surface without correcting the condensation, leak, or ventilation gap behind it is a temporary win at best.
Treat small, isolated patches as a DIY job with proper precautions, and treat anything widespread, recurring, or affecting a vulnerable household member as a call to bring in a professional. That’s not caution for its own sake; it reflects where the actual risk sits.
— Akita
Sources
Facts and safety guidance in this article draw on the EPA’s mould and health guidance, its mould cleanup advice, the CDC’s basic facts about mould, and Energy.gov’s air conditioner maintenance guidance, which remain the primary references for health and remediation decisions.
If you’d rather have a qualified engineer assess a vent mould problem tied to your air conditioning system, Akita’s domestic air conditioning installation and servicing team covers Suffolk, Norfolk, and Essex and can identify whether the cause is condensation, a duct fault, or a maintenance issue.
This article is general information, not a substitute for advice from a qualified doctor. Consult a qualified healthcare professional about your own circumstances before acting on anything here.
FAQ
What are the warning signs of mould toxicity?
Common symptoms linked to mould exposure include nasal congestion, coughing, throat and eye irritation, skin irritation, and worsened asthma symptoms, according to the EPA. Symptoms that ease when you leave the house and return when you’re back are a strong clue the home environment is the trigger.
What does black mould look like around a vent?
Black mould on vents usually appears as dark speckled patches or a felt-like coating concentrated around the grille edges, rather than an even grey dust layer, and it often smears rather than wipes away cleanly.
Is it safe to stay in a home with mould coming through an AC vent?
It depends on the extent and who lives there. The EPA advises that small patches can be cleaned safely, but widespread or recurring contamination, especially with children, older adults, or anyone with asthma in the home, warrants professional assessment rather than staying put and hoping it clears.
How can I remove mould in vents without dismantling the whole system?
Remove and clean accessible grilles with detergent and water, wipe surrounding surfaces while damp, and change filters regularly. For contamination further inside the ductwork, the EPA notes that full duct cleaning is only necessary when inspection confirms significant growth, so a targeted professional inspection is usually more useful than attempting to strip the system apart yourself.