

Energy efficient HVAC setup workflow for UK homes
TL;DR:
- An energy-efficient HVAC workflow involves accurate load calculation, proper equipment selection, meticulous installation, and documented commissioning to reduce energy use by 20 to 40%. Skipping steps like Manual J assessment, duct sealing, or commissioning documentation often results in higher costs, inefficiency, and system failure over time. Implementing smart controls and regular maintenance further sustains optimal performance and long-term savings.
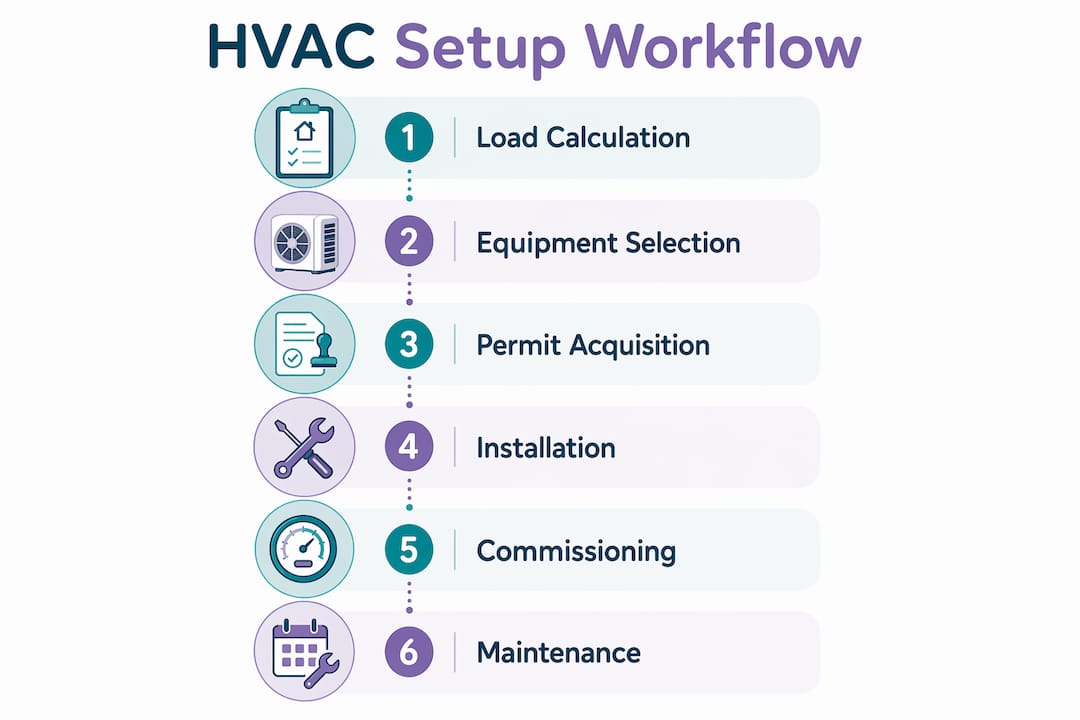
An energy efficient HVAC setup workflow is the methodical process of sizing, installing, and commissioning a climate control system to deliver maximum performance at minimum running cost. Done correctly, upgrading to a modern 16+ SEER2 unit combined with ductwork optimisation cuts cooling energy consumption by 20 to 40%. The workflow covers four distinct phases: load calculation, equipment selection, installation, and commissioning. Each phase builds on the last, and skipping any one of them costs you money from day one. This guide walks you through every step, flags the mistakes that quietly drain efficiency, and explains which technologies sustain those savings over time.
What prerequisites are needed before an energy efficient HVAC installation?

The entire workflow stands or falls on one calculation done before a single component is ordered. Manual J load calculation is the industry standard method for determining exactly how much heating and cooling capacity your home requires. Software tools such as Wrightsoft and Cool Calc run the calculation in 60 to 120 minutes, factoring in floor area, ceiling height, insulation values, window orientation, and typical occupancy. Skipping Manual J leads directly to oversized or undersized units, both of which cause discomfort, excess energy use, and premature equipment wear.
Before your installer opens any software, gather the following information about your property:
- Floor area and ceiling heights for every conditioned room
- Insulation specification in walls, loft, and floor (U-values if available)
- Window area and orientation, including glazing type (single, double, or triple)
- Occupancy patterns, including how many people live in the property and typical hours of occupation
- Existing ductwork condition, if applicable, including age and any known leaks
Once the load calculation is complete, equipment selection follows the AHRI matching process. AHRI (Air-Conditioning, Heating, and Refrigeration Institute) certification confirms that the indoor and outdoor units you choose have been tested together as a matched pair. Replacing only one component of a split system significantly reduces efficiency and often voids the manufacturer warranty. This is a detail many homeowners discover too late.
Permit acquisition runs in parallel with equipment selection. In the UK, permitted development rights cover most domestic air conditioning installations, but properties in conservation areas or listed buildings require planning permission. Utility rebates and the Boiler Upgrade Scheme are worth investigating at this stage too, since some incentives require pre-approval before installation begins.
Pro Tip: Ask your installer to share the completed Manual J report before any equipment is ordered. If they cannot produce one, that is a clear signal to find a different contractor.
What are the detailed steps of the HVAC system installation process?
A properly executed installation follows a defined sequence. Deviating from it, even with good intentions, introduces inefficiencies that compound over the system’s lifetime. Here is the full workflow:
- Site preparation and permit confirmation. Clear access routes for equipment delivery, confirm permit status, and protect flooring and walls in working areas.
- Removal of the old system. Recover refrigerant in compliance with F-Gas regulations before disconnecting the existing unit. Dispose of components responsibly.
- Ductwork evaluation and sealing. Inspect existing ductwork for leaks, damage, and undersized sections. Duct sealing saves up to 30% of conditioned air that would otherwise escape before reaching the room. Budget for this work during installation rather than retrofitting it later.
- New equipment installation. Mount the indoor unit, position the outdoor unit on a level anti-vibration pad, and run refrigerant lines through correctly sized and insulated line sets.
- Refrigerant line brazing under nitrogen. Brazing copper joints while flowing dry nitrogen through the lines prevents copper oxide scale forming inside the refrigerant circuit. Installers who skip nitrogen purging leave contamination inside the system that degrades compressor life.
- Pressure testing. Pressurise the refrigerant circuit with dry nitrogen to the manufacturer’s specified test pressure and hold for a minimum of 30 minutes to confirm there are no leaks.
- Evacuation. Use a two-stage vacuum pump to pull the system down to 500 microns or below. This removes moisture and non-condensable gases that would otherwise reduce efficiency and corrode internal components.
- Refrigerant charging to manufacturer specification. Charge by weight using calibrated scales, not by pressure alone. Pressure-only charging is imprecise and a common cause of efficiency loss.
- Commissioning tests. This is the phase that separates a professional installation from a basic one.
| Commissioning test | What it measures | Target outcome |
|---|---|---|
| Static pressure | Resistance in ductwork | Within manufacturer’s specified range |
| Airflow (CFM per room) | Volume of conditioned air delivered | Matches Manual J design figures |
| Temperature split | Difference between supply and return air | Typically 16 to 22°C for cooling |
| Subcooling and superheat | Refrigerant charge accuracy | Manufacturer’s published values |
| Electrical checks | Voltage, amperage, and earth continuity | Within nameplate tolerances |
Commissioning requires documented tests of subcooling, superheat, airflow, and static pressure, with written results handed to the homeowner. Contractors who refuse to supply a commissioning report leave the installation incomplete, regardless of how tidy the pipework looks.
Pro Tip: Photograph the commissioning report and store it digitally alongside your warranty registration. You will need these figures as a benchmark when the system is serviced in future years.
Which technologies enhance HVAC energy efficiency after installation?
The right controls and supplementary technologies can extract significantly more value from a well-installed system. Simple control changes alone can save 10 to 20% on energy consumption, which makes this one of the highest-return areas to address after installation.
The most impactful technologies to consider are:
- Smart thermostats with adaptive recovery. Devices such as those using learning algorithms adjust pre-conditioning start times based on how long your home takes to reach setpoint. Setback programming saves 8 to 12% on annual energy bills with no comfort penalty, but only when configured correctly rather than left on factory defaults.
- Demand controlled ventilation (DCV) with CO2 sensors. DCV adjusts fresh air supply based on actual occupancy rather than a fixed schedule. In rooms that are frequently empty, this prevents the system from conditioning air that nobody is breathing.
- Mechanical ventilation with heat recovery (MVHR). MVHR transfers heat energy between the outgoing stale air and the incoming fresh air stream. MVHR can recover up to 90% of heat that would otherwise be lost through ventilation, making it one of the strongest sustainability upgrades available for UK homes.
- Air economisers for free cooling. On mild days, an economiser draws cooler outdoor air to meet the setpoint without running the compressor at all. The Department of Energy confirms this reduces compressor energy use substantially in climates with significant cool periods, which describes most of the UK for a large part of the year.
- AI-based predictive maintenance platforms. These monitor operational data continuously and flag performance drift before it becomes a fault. A system running at 95% efficiency looks fine to the naked eye but costs measurably more to run than one at 100%.
For any of these technologies to deliver their rated savings, the indoor and outdoor units must remain a matched AHRI-certified pair. Mixing brands or generations of equipment to save money on a replacement part undermines the efficiency of the entire system.
You can also complement your HVAC improvements with energy efficient window upgrades, since reducing heat gain and loss through glazing directly reduces the load your system must handle.
What common mistakes reduce HVAC efficiency, and how to avoid them?
The most expensive HVAC mistakes are not dramatic failures. They are quiet, cumulative inefficiencies that inflate your energy bills for years before anyone notices. Understanding them is the fastest way to protect your investment.
- Oversizing or undersizing the unit. An oversized unit short-cycles, switching on and off repeatedly without completing a full conditioning cycle. This leaves humidity uncontrolled and causes accelerated wear on the compressor. An undersized unit runs continuously and never reaches setpoint on peak days. Both outcomes are direct consequences of skipping the Manual J calculation. You can read more about how load calculations work before speaking to any installer.
- Neglecting duct sealing. Leaky ductwork is the single most common source of wasted energy in ducted systems. Up to 30% of conditioned air can escape through joints and penetrations before it reaches the room. Sealing during installation costs far less than retrofitting later.
- Improper refrigerant charging. Overcharging or undercharging by even 10% reduces system efficiency measurably and shortens compressor life. Charging by pressure rather than weight is the usual cause.
- Brazing without nitrogen. Copper oxide scale created during brazing without nitrogen purging circulates through the refrigerant circuit and damages the expansion valve and compressor over time.
- Skipping commissioning documentation. Without a baseline commissioning report, there is no way to measure future efficiency drift during servicing.
- Leaving thermostat settings on factory defaults. Most thermostats ship with generic settings that do not reflect your home’s thermal characteristics. Custom configuration is often neglected but takes less than an hour to complete.
“The difference between a good installation and a poor one is rarely visible. It lives in the commissioning report, the nitrogen log, and the duct leakage test results.”
Pro Tip: Request a blower door test and duct leakage test at the end of installation. Some UK utility providers subsidise these tests, and the results give you a verified baseline for future comparisons.
What maintenance practices sustain HVAC efficiency over time?
A well-installed system loses efficiency gradually if maintenance is neglected. Dirty coils cause a 10 to 20% efficiency drop, and routine coil cleaning restores 5 to 10% of that loss immediately. The following sequence keeps your system performing at its design specification:
- Monthly filter checks. Replace or clean filters according to the manufacturer’s schedule. A clogged filter increases static pressure, forces the blower motor to work harder, and reduces airflow to every room.
- Annual coil cleaning. Both the evaporator coil (indoor) and condenser coil (outdoor) accumulate dirt that insulates the heat exchange surface. Professional cleaning with appropriate coil cleaner restores heat transfer efficiency.
- Condensate drain inspection. A blocked condensate drain causes water to back up into the unit, potentially damaging electrical components and creating conditions for mould growth.
- Refrigerant charge verification. A qualified F-Gas engineer checks refrigerant charge annually using subcooling and superheat measurements, not pressure alone.
- Electrical inspection. Check capacitors, contactors, and wiring terminations for signs of wear or corrosion. Failing capacitors are one of the most common causes of compressor failure.
- Duct leakage retest every three to five years. Duct joints can work loose over time due to thermal expansion and contraction. Retesting confirms the sealing work from installation remains intact.
- TM44 inspection every five years. TM44 inspections are required every five years in the UK for systems over 12 kW. They identify energy waste and provide documented recommendations for improvement.
Using your original commissioning report as a benchmark during each service visit allows your engineer to spot efficiency drift early. A residential HVAC maintenance checklist gives you a practical framework for tracking these tasks year by year. Planning system replacement 6 to 12 months before the current system reaches end of life gives you time to compare quotes, apply for rebates, and avoid rushed decisions made during a breakdown.
Key takeaways
A correctly executed energy efficient HVAC setup workflow, from Manual J load calculation through to documented commissioning, delivers 20 to 40% lower energy consumption and protects the system’s efficiency for its full working life.
| Point | Details |
|---|---|
| Start with Manual J | Load calculation using Wrightsoft or Cool Calc prevents costly oversizing and undersizing. |
| Seal ducts during installation | Duct sealing during installation saves up to 30% of conditioned air and costs less than retrofitting. |
| Commission and document | Subcooling, superheat, airflow, and static pressure tests must be recorded and handed to the homeowner. |
| Add smart controls | Correctly configured setback programming saves 8 to 12% on annual energy bills with no comfort trade-off. |
| Maintain on a schedule | Annual coil cleaning restores 5 to 10% efficiency; TM44 inspections are legally required every five years for larger systems. |
What experience has taught us about energy efficient HVAC setups
The most consistent pattern we see at Akita is this: homeowners who invest in duct sealing during installation outperform those who spend the same money on a higher-specification unit with leaky ductwork. A 20 SEER2 system losing 25% of its conditioned air through duct leaks performs worse than a 16 SEER2 system in a tight, well-sealed installation. The equipment rating on the brochure is not the efficiency you experience in your home.
We also see the consequences of skipped commissioning regularly. A system that has never had its refrigerant charge verified, its airflow measured, or its static pressure documented is essentially running blind. The homeowner has no baseline, the servicing engineer has nothing to compare against, and efficiency drift goes undetected for years.
The advice we give every customer before they sign anything is straightforward: ask the installer for their Manual J methodology, ask to see a sample commissioning report from a previous job, and ask whether they braze under nitrogen. Those three questions filter out the majority of contractors who will leave you with an underperforming system.
Planning ahead matters more than most people realise. Booking a replacement 6 to 12 months before the current system fails gives you access to rebate schemes, time to get multiple quotes, and the ability to choose equipment rather than accept whatever is available quickly. Decisions made during a July heatwave with no cooling in the house are rarely the best ones.
— Akita
Get your energy efficient system installed by Akita

Akita installs energy efficient air conditioning systems across Suffolk, Essex, and Norfolk, following the full workflow described in this article. Every installation includes a Manual J load assessment, AHRI-matched equipment selection, nitrogen-purged brazing, and a written commissioning report handed to you on the day. Akita also supports permit applications, warranty registration, and ongoing maintenance contracts to protect your investment long after installation day. If you are ready to replace an ageing system or install climate control for the first time, fixed price installation options are available with transparent costs and no hidden charges. Speak to the Akita team to get a load calculation and quote for your property.
FAQ
What is a Manual J load calculation?
Manual J is the industry standard method for calculating exactly how much heating and cooling capacity a home requires, using software such as Wrightsoft or Cool Calc. Skipping it leads to oversized or undersized equipment, both of which waste energy and cause premature wear.
How much energy can duct sealing save?
Properly sealed ductwork prevents up to 30% of conditioned air from escaping before it reaches the room, making it one of the highest-return investments in any HVAC installation.
What does commissioning involve for a new HVAC system?
Commissioning involves documented measurements of subcooling, superheat, airflow volume, static pressure, and refrigerant charge, all verified against manufacturer specifications and recorded in a written report for the homeowner.
How often should an HVAC system be serviced in the UK?
Annual servicing is recommended for all residential systems, covering coil cleaning, refrigerant charge verification, and electrical inspection. Systems over 12 kW also require a TM44 inspection every five years under UK regulations.
Can smart thermostats genuinely reduce energy bills?
Yes. Smart thermostats with correctly configured setback and adaptive recovery programming save 8 to 12% on annual energy bills, but only when set up to match the home’s actual thermal characteristics rather than left on factory defaults.