

12–18 Month ROI: Field Proven HVAC Remote Monitoring for Facilities
HVAC remote monitoring pays for itself through fewer emergency callouts and lower energy bills, typically inside 12 to 18 months. Facility managers and property owners get the most from it because their sites have several assets running continuously; HVAC teams benefit from earlier fault warnings and less time driving between sites to diagnose problems that a sensor already flagged.
TL;DR:
- Proper site surveys and sensor calibration before installation are crucial; skipping these steps leads to false alarms and unreliable data.
- Gateway placement must be central and tested beforehand to prevent coverage issues and dropped packets, especially in shielded or basement locations.
- Data should be used as guidance, not direct control; integrating with existing BMS via secure protocols keeps safety interlocks intact and minimizes risks.
- Continuous remote monitoring typically offers 10 to 25 percent energy savings, with payback within 12 to 18 months for most deployments.
- The main value lies in early fault detection, reduced site visits, and extending equipment lifespan, rather than immediate occupant comfort improvements.
Table of Contents
- What is HVAC remote monitoring?
- How HVAC system monitoring actually works
- The real benefits: energy, maintenance and uptime
- Deployment checklist: plan, instrument, observe, integrate, act
- Best practices and the mistakes that undermine most projects
- Integrating with a BMS or BEMS safely
- Akita’s view from the plant room
- Why instrument-first beats install-and-hope
- Get a site survey from Akita
- Sources
- FAQ
What is HVAC remote monitoring?
HVAC remote monitoring is the continuous collection of live data from heating, ventilation, and air conditioning equipment, sent to a dashboard so someone can see how a system is running without standing next to it. That’s a different job to remote control, which just lets you flick a thermostat or setpoint from a phone. Monitoring builds the picture; control acts on it.
A working system needs several parts:
- Sensors measuring temperature, humidity, pressure, vibration, and energy draw at the unit or zone level
- Gateways that collect sensor readings and pass them onward
- Communications linking gateways to the cloud, usually LoRaWAN, Wi-Fi, or cellular
- Analytics and dashboards that turn raw numbers into alerts, trends, and reports
For sites with an existing Building Management System, remote monitoring usually sits alongside it as an added layer rather than a replacement, feeding extra visibility into zones or plant that the BMS never quite reached.
How HVAC system monitoring actually works
Data moves in a fairly predictable path: a sensor takes a reading, a gateway pulls it in, and a communications link carries it to a cloud platform where analytics software decides whether anything needs attention. Distributed sensor networks across multiple floors commonly run on LoRaWAN because of its range and battery life, which avoids loading dozens of extra devices onto a corporate Wi-Fi network that IT would rather you didn’t touch.
The analytics layer does the real work, and it operates at several levels of sophistication:
- Threshold alerts flag a reading that’s crossed a fixed limit, such as a supply temperature drifting too high
- Fault detection and diagnosis (FDD) compares live behaviour against expected patterns to catch stuck dampers or short cycling
- Anomaly detection spots readings that don’t match historical norms, even without a preset rule
- Predictive models forecast failure risk based on trends rather than single readings
Commercial platforms typically combine zone sensors with plant-side metering to catch faults like sensor drift, stuck dampers, and concurrent heating and cooling that would otherwise run unnoticed for weeks. The strongest diagnostic signals rarely come from one sensor alone. Pairing vibration data with current draw and delta-T across a coil can flag bearing wear or fouling well before the unit actually fails, giving maintenance teams a genuine head start rather than a reactive scramble.
The real benefits: energy, maintenance and uptime
The energy case is the easiest to quantify. Continuous monitoring deployments typically report energy savings of 10 to 25%, with many customers reaching payback within 12 to 18 months. Those savings mostly come from catching equipment running against schedule, correcting simultaneous heating and cooling, and tightening setpoints once real usage patterns are visible.
The maintenance case matters just as much, even if it’s harder to put a single number on. Vendor case studies show that remote visibility cuts unnecessary site visits and lets technicians triage faults before they travel, which improves first-time fix rates and shortens mean time to repair (MTTR). Fewer surprise failures also mean equipment tends to run longer between breakdowns, lifting mean time between failures (MTBF).
What typically drives the return:
- Correcting equipment running outside occupied hours
- Catching drifting sensors before they skew control decisions
- Reducing emergency technician visits in favour of scheduled ones
- Extending equipment life through earlier intervention
Occupant comfort tends to improve as a side effect rather than the headline. Fewer hot or cold complaints usually just means fewer faults left running unnoticed. The Akita guide to HVAC diagnostics covers how that data gets translated into a maintenance schedule rather than sitting unused in a dashboard.
Deployment checklist: plan, instrument, observe, integrate, act
Rolling out remote monitoring in the wrong order is the single biggest reason projects underdeliver. Follow a sequence, not a shopping list.
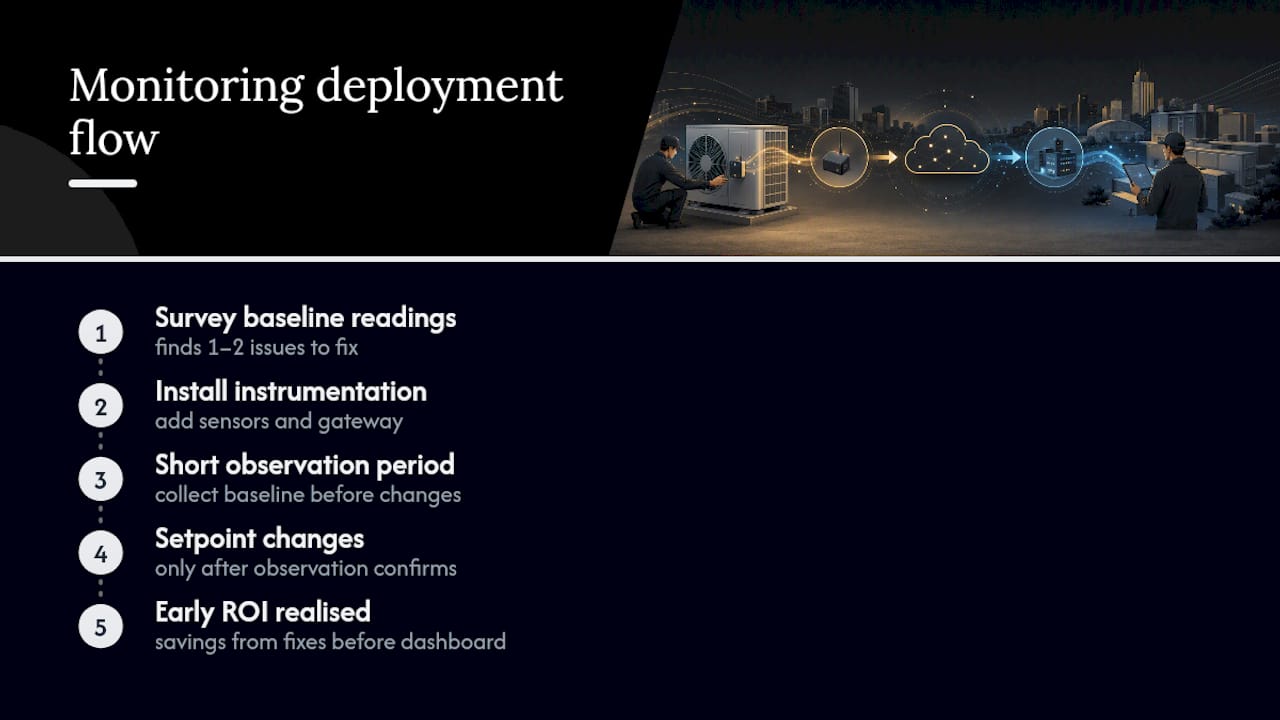
- Survey the site first. Walk every plant room and zone before ordering hardware, noting where equipment actually sits versus where drawings say it does.
- Instrument before you touch controls. Fit sensors and let the system run untouched for four to eight weeks to establish a genuine baseline.
- Pick your KPIs early. Decide whether you’re chasing energy cost, MTTR, or comfort complaints, then map sensors to the zones and plant that actually influence that metric.
- Site the gateway centrally, not tucked into a shielded IT comms room or a basement, and choose backhaul (Wi-Fi, cellular, or LoRaWAN) based on building layout, not convenience.
- Integrate as an advisory layer first, feeding recommendations to the BMS rather than handing over control authority immediately.
- Validate before acting. Cross-check alerts against what a technician finds on site before trusting the model fully.
- Train staff to read the dashboard. Someone needs to translate an alert into a work order, or the investment just sits there generating noise.
Pro Tip: Resist the urge to start adjusting setpoints in week one. The observation period exists to teach the model what normal looks like on your specific site, and skipping it is why so many systems generate false alarms early on.
Best practices and the mistakes that undermine most projects
Gateway placement causes more underperforming deployments than any other single factor. A gateway shoved into a shielded IT comms room or a basement corner routinely produces poor indoor coverage and dropped packets, because those spaces are built to block signal, not carry it. Site the gateway centrally to the sensor field and test with a temporary unit before committing to a fixed mounting point.
Data quality is the second failure point, and it’s less visible until it bites. Poor calibration and unvalidated sensor readings are a leading reason facility teams stop trusting the system and quietly abandon it. Calibrate before go-live, not after complaints start.
False positives during the early observation window are normal, not a sign of a broken system. Tune thresholds gradually as the baseline settles rather than disabling alerts altogether.
| Pitfall | Why it happens | Fix |
|---|---|---|
| Gateway in IT room or basement | Shielding blocks signal | Site centrally, test with temporary unit |
| Uncalibrated sensors | Skipped at installation to save time | Validate readings against manual checks before go-live |
| Alert fatigue from false positives | Models untrained during early weeks | Allow 4 week observation period before acting on alerts |
| Weak telemetry security | Default credentials, unencrypted links | Encrypt in transit, rotate credentials, clarify data ownership |
Integrating with a BMS or BEMS safely
The safest integration pattern treats monitoring data as advisory rather than authoritative. Publishing sensor readings and recommendations as advisory points to an existing BMS, rather than handing that system direct control, avoids the need to re-commission building controls and keeps existing safety interlocks intact while the new layer proves itself.
Three protocols cover most real deployments:
- BACnet/IP for talking to existing building automation equipment, the standard in most commercial BMS setups
- Modbus TCP for older plant equipment that predates IP-native comms
- MQTT for lightweight sensor-to-cloud messaging where bandwidth or power is limited
On security, keep the basics tight: encrypt telemetry in transit, avoid default credentials on gateways, and get clear on who owns the data once it leaves the building, particularly if a third-party platform hosts the dashboard.
Akita’s view from the plant room
Most survey visits turn up the same three issues: sensors that were never calibrated after install, a gateway hidden somewhere convenient rather than somewhere useful, and a BMS nobody wants touched because nobody’s confident it will still work afterwards.
Monitoring is often phased into maintenance memberships rather than treated as a separate product. A survey establishes baseline readings first; instrumentation and a short observation period follow before any setpoint changes get made. For homeowners and smaller commercial clients, that usually means the survey itself surfaces one or two issues, a stuck damper, a drifting sensor, worth fixing before monitoring even goes live. Early ROI tends to show up there, before the dashboard reports anything at all.
Why instrument-first beats install-and-hope
The conventional advice on remote monitoring treats it as a technology purchase: buy sensors, connect them, watch the dashboard. That skips the part that actually determines whether the project works, which is the four to eight weeks of doing nothing except watching a system behave normally.
Most underperforming deployments trace back to skipping that step, not to weak hardware. A gateway in the wrong room, a sensor that was never calibrated, a model asked to spot anomalies before it knows what normal looks like. None of that is a technology failure. It’s a sequencing failure, and it’s entirely avoidable.
What the evidence actually supports is a narrower claim than the marketing usually makes: remote monitoring is an operational discipline that happens to run on hardware, not a hardware purchase that happens to include some monitoring. Treat the survey and observation period as the project, not the preamble to it, and the energy and maintenance gains follow. Skip them, and you’re left with a dashboard nobody trusts and alerts nobody acts on.
Prioritise the boring part first: calibration, gateway siting, and a genuine baseline. Everything else is easier once that’s right.
— Akita
Get a site survey from Akita
Akita is the option for facility teams and property owners who want monitoring set up properly rather than bolted on. Survey, retrofit installation, and ongoing maintenance memberships all sit under one contractor relationship, so the instrument-first approach covered above isn’t something you have to manage yourself.
A survey visit checks sensor placement, gateway siting, and existing plant condition before anything gets fitted, the same groundwork that determines whether a deployment actually delivers the energy and maintenance gains discussed here. For commercial sites across Suffolk, Norfolk, and Essex, Akita’s commercial air conditioning services cover installation and ongoing servicing under one plan. Homeowners looking at a retrofit can start with the domestic air conditioning installation page, or if a unit is already struggling, the air conditioning repair service handles fast turnaround. Book a survey to get a clear view of what your site needs before committing to any hardware.
Sources
- Remote Monitoring Solutions for HVAC Systems: Benefits & ROI
- Gateway placement for distributed systems based sensor networks — technical report
- IoT device calibration: ensuring accuracy in low-power wireless sensors
- On data quality and sensor validation (technical paper)
FAQ
What is the $5,000 rule for HVAC systems?
It’s a rough guideline some contractors use during replacement decisions: multiply the repair cost by the system’s age, and if the result exceeds a certain threshold, replacement is usually the better financial call than another repair.
How can I remotely monitor the temperature of my house?
Fit wireless temperature sensors in key rooms connected to a gateway and app, which is the same basic architecture facility-scale HVAC monitoring uses, just scaled down to a handful of sensors instead of a full plant.
How do I control my HVAC system remotely?
A smart thermostat or connected control panel linked to Wi-Fi lets you adjust setpoints and schedules from a phone app, though true remote monitoring goes further by tracking performance data over time rather than just letting you flip a switch.
What is the most popular remote patient monitoring equivalent for buildings?
Buildings don’t have a direct patient-monitoring parallel, but the closest equivalent is continuous plant and zone sensor monitoring feeding a dashboard, which functions the same way as a wearable feeding vitals to a clinician: constant data, flagged the moment something drifts from baseline.
Is HVAC remote monitoring worth it for a small commercial site?
Yes, provided the site has enough equipment running continuously to justify the setup. Even a modest retrofit tends to surface calibration or scheduling issues during the initial survey that pay for the visit before monitoring even goes live.