

Homeowners: What to Observe and Photograph When Your AC Fan Won't Spin
Most of the time, an AC fan that won’t spin comes down to one of four things: a power interruption at the thermostat or breaker, a failed capacitor, a seized motor, or debris jammed in the unit. If the outdoor unit hums but the fan blade sits still, suspect the capacitor first. If it’s dead silent, check power and the contactor. Either way, switch the system off before you do anything else, since a stalled fan lets the compressor overheat fast.
TL;DR:
- A failed capacitor typically shows visual signs like bulging, oil leakage, or a cracked casing, which indicate it needs replacement to prevent further damage.
- An AC fan that hums but does not spin usually points to a faulty capacitor, while total silence suggests a power or wiring issue, such as a tripped breaker or disconnected control box.
- Mechanical blocking or seized bearings cause a fan to stop spinning, but if blades spin freely when manually turned, the problem is electrical; resistance or wobbling suggests mechanical damage.
- Diagnostic costs range from about $80 to $200, with capacitor replacements costing roughly $150 to $400, while motor or compressor failures can cost significantly more and require professional repair.
- Handling the capacitor yourself is dangerous due to stored electrical charge, and professional testing and replacement are strongly recommended for safety and accuracy.
Table of Contents
- What quick checks can I do before opening the AC unit?
- Why is my AC fan not spinning: electrical causes explained
- How do I check if the fan motor or blades are jammed?
- When should I call an HVAC technician, and what will it cost?
- Is it safe to inspect the capacitor myself?
- How can I stop this happening again?
- Why we still recommend a technician for capacitor and motor faults
- Sources
What quick checks can I do before opening the AC unit?
Before you touch a screwdriver, run through the checks that need no tools and no risk. Most fan failures trace back to something upstream of the outdoor unit, not the motor itself.
- Check the thermostat. Confirm it’s set to “cool,” the target temperature is at least a few degrees below room temperature, and the display isn’t dim from dead batteries.
- Check the breaker panel. Look for a tripped breaker feeding the outdoor unit and reset it once. If it trips again immediately, stop and call a technician rather than resetting repeatedly.
- Check the outdoor disconnect box. This is the small metal or plastic box mounted near the condenser. Confirm the pull block is fully seated.
- Swap or inspect the air filter. A filthy filter can trigger a safety shutoff on some systems, mimicking a fan fault.
- Clear vegetation and debris from around the condenser. Give it at least two feet of clearance on all sides.
- Listen carefully. Note whether you hear a hum, a click, nothing at all, or a slow, struggling spin. That single detail narrows the diagnosis considerably, as covered next.
If none of this brings the fan to life, you’re moving from housekeeping into genuine AC fan troubleshooting, and the sound the unit makes becomes your main clue.
Why is my AC fan not spinning: electrical causes explained
The noise pattern coming from the outdoor unit tells you almost everything before you open a panel. A humming condenser with a motionless fan usually points to a failed run capacitor. Clicking, especially a repeated click every few seconds, often means the contactor is trying and failing to latch, or the motor is attempting to start and can’t. Total silence usually means power simply isn’t reaching the unit at all, which loops back to the breaker or disconnect.
The capacitor is the component most homeowners can inspect visually without any real danger, provided the power is off. Look for:
- A bulging or domed top instead of a flat one.
- Oily residue leaking from the case or seams.
- A cracked or split casing.
Visible bulging or oil leakage is a reliable sign the capacitor has failed internally, and at that point further bench testing isn’t necessary. A technician who does test one will compare the reading against the microfarad (MFD) rating printed on the label. A measured capacitance more than roughly 6% above or below that rating confirms the capacitor is failing, and it’s this ±6% tolerance rule that separates a healthy capacitor from a dying one on paper.
Here’s the number that matters most for your wallet: catching a bad capacitor early, before it strains the compressor, is one of the cheapest fixes in HVAC repair. Waiting through repeated failed startups is what turns a small part into a large bill.
Pro Tip: Photograph the capacitor’s label before you call anyone. The MFD rating and voltage on that sticker let a technician bring the correct replacement part on the first visit instead of a second trip.
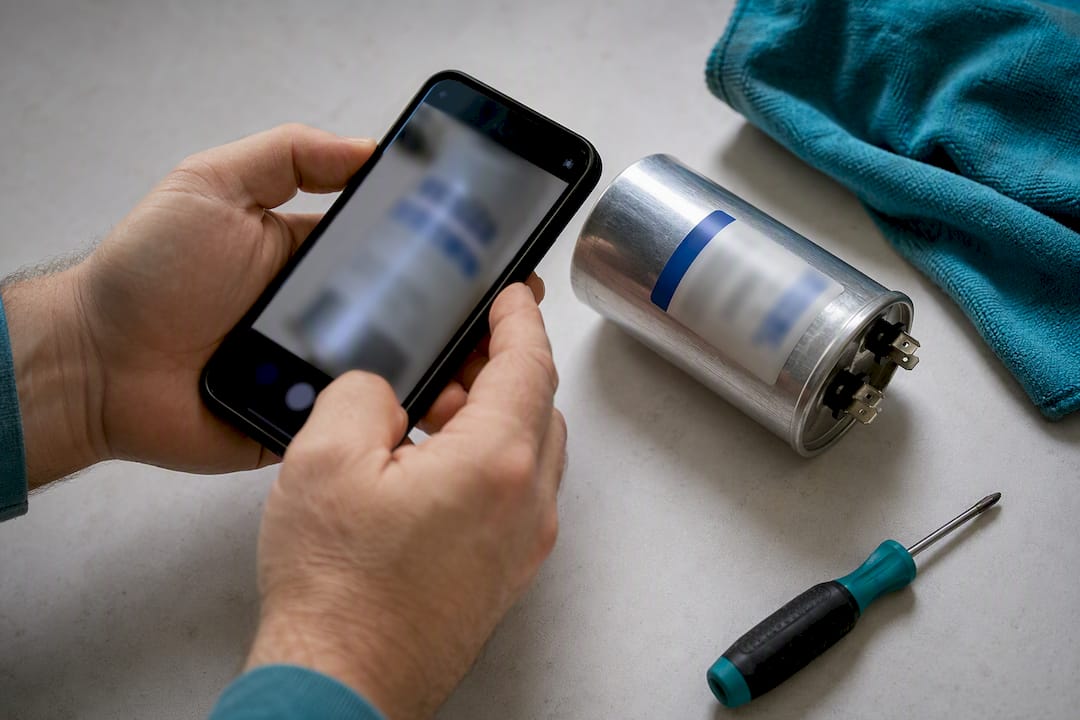
Repeated breaker trips or a unit that draws unusually high current on startup point to a deeper electrical fault, possibly in the motor windings or wiring itself, and that diagnosis belongs to a licensed technician. What you can usefully hand over on the phone: the exact sequence of sounds, whether the breaker trips instantly or after a delay, and those capacitor label photos.
How do I check if the fan motor or blades are jammed?
Electrical faults get most of the attention, but a physically stuck motor produces identical symptoms from the outside: no spin, maybe a hum. The way to tell the two apart is a simple manual test, done only with the power completely off.
- Cut power at the breaker and the outdoor disconnect, and confirm the fan is fully stopped.
- Use a long, non-conductive stick, such as a wooden dowel, to nudge the fan blade through a full rotation.
- Stiff resistance or a grinding feel means the motor bearings have likely seized and the motor probably needs replacing.
- If the blade spins freely and smoothly by hand, the motor itself is fine. Something electrical, most often the capacitor or a wiring fault, is stopping it from starting under power.
- While you’re in there, check for bent blades or a loose motor mount. A blade that’s been knocked off balance by hail or a stray branch can wobble enough to damage the motor bearing over time.
This is the cleanest fork in the whole diagnosis: freely spinning blade means electrical, resistant blade means mechanical. Everything else builds on that one observation.
When should I call an HVAC technician, and what will it cost?
Some symptoms mean stop troubleshooting immediately and pick up the phone. A burning smell from the outdoor unit, a breaker that trips every time you reset it, a capacitor with visible bulging or leakage, or a compressor that hums continuously without ever starting the fan are all signs of a fault beyond safe DIY territory.
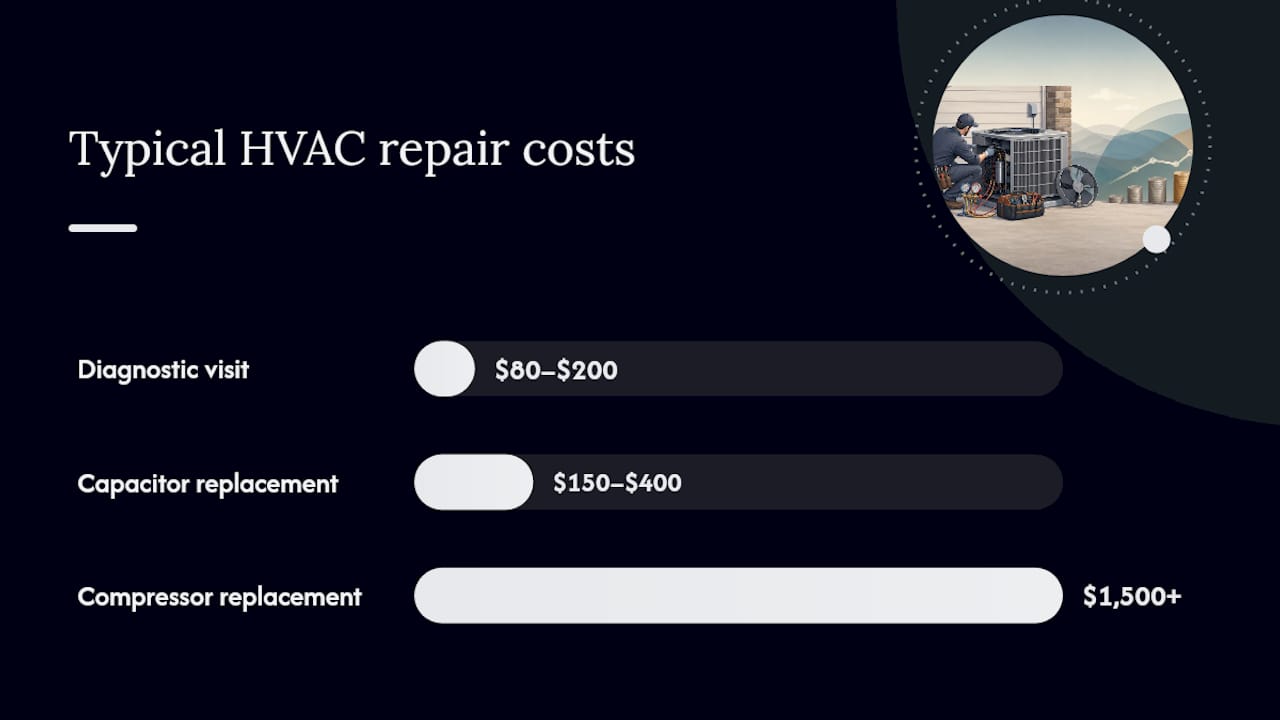
Cost varies by what’s actually broken, but the typical ranges look like this:
- Diagnostic visit: roughly $80 to $200, often credited toward the repair if you proceed.
- Capacitor replacement, installed: roughly $150 to $400, depending on the part and local labour rates.
- Fan motor replacement: meaningfully higher than a capacitor, since the part itself costs more and swapping it takes longer.
- Compressor replacement: $1,500 and up, which is exactly why shutting the system off early matters so much.
Before the technician arrives, gather what you already have: photos of the capacitor label and any visible damage, a timeline of when the problem started, and a note of what you’ve already tried. That prep work alone can shorten a diagnostic visit and keep the bill closer to the low end of the range. For a broader sense of what warrants a service call versus a wait-and-watch approach, this guide to HVAC repair warning signs is worth a read.
Is it safe to inspect the capacitor myself?
Capacitors store an electrical charge even after the power is switched off, and that stored charge can deliver a genuinely dangerous, potentially lethal shock. This is the one part of AC fan troubleshooting where the safe answer and the DIY-friendly answer are not the same thing.
- Turn off power at the thermostat, then at the breaker panel, then pull the outdoor disconnect block.
- Wait several minutes and, if you have the equipment and know how to use it, verify zero voltage before opening any panel.
- Look, don’t touch: check for bulging, leaking, or cracked casing from a safe distance.
- Photograph the label and any damage for the technician.
- Do not attempt to discharge, probe, or replace the capacitor yourself.
Testing or replacing an HVAC capacitor safely requires proper tools and training, and for most homeowners, calling a professional is both the safer and more cost-effective route once a fault is suspected.
If you see bulging or leakage, stop right there. That visual alone is enough to confirm failure, and no further testing changes the outcome.
Pro Tip: Never rely on “it looks fine” as your safety check. A capacitor can look intact and still hold enough charge to hurt you, which is why the power-off, wait, and verify sequence matters even when nothing looks obviously wrong.
How can I stop this happening again?
A handful of habits prevent most of the fan failures covered above, and none of them require technical skill.
- Replace or clean the indoor air filter on a regular schedule, not just when airflow feels weak.
- Keep at least two feet of clearance around the outdoor condenser, and trim back vegetation before it grows into the grill.
- Clear leaves and debris off the top grill after storms or in autumn.
- Book an annual professional service that tests the capacitor’s capacitance, checks the contactor, and measures amp draw under load, since a capacitor can test fine on the bench yet still fail under real summer heat.
- Run through this checklist before peak cooling season starts, not after the first heatwave hits.
Pro Tip: Mark your filter changes on a calendar reminder. It’s the single cheapest habit that prevents both airflow restriction and the strain that shortens a fan motor’s life.
Why we still recommend a technician for capacitor and motor faults
Anyone can spot a bulging capacitor or a jammed blade. Confirming the correct microfarad and voltage match, replacing it to OEM spec, and re-testing under load takes training most homeowners simply don’t need to have. A technician worth hiring explains the cause in plain terms, gives you a written quote before starting, and verifies the fix with a running test, not a guess.
— Akita
If your outdoor fan has already told you what’s wrong, whether that’s a suspect capacitor, a burning smell, or a compressor that hums without starting, Akita’s air conditioning repair service covers diagnosis and repair across Suffolk, Norfolk, and Essex, with a clear quote before any work begins.
Sources
- HVAC Capacitor Testing: How to get safe & accurate results
- AC capacitor troubleshooting guide — Imperial AC Supply