

Cut Heat Pump Noise 5–10 dB Without Voiding Your Warranty
Most heat pump noise problems trace back to three things: where the unit sits, how well it’s isolated from vibration, and basic maintenance neglect. Correct siting, anti-vibration measures and a proper service visit resolve the majority of complaints without touching the unit itself. Acoustic screening can shave a further 5 to 10 dB off perceived noise, but only if airflow stays clear. Metallic clunks, sudden volume jumps, or a persistent tonal whine mean it’s time to call a technician rather than reach for another rubber pad.
TL;DR:
- Most noise issues can be resolved by proper siting, vibration isolation, and maintenance, reducing the need for costly fixes or enclosures.
- Off-the-shelf anti-vibration pads, insulation jackets, and proper placement can cut noise levels by 2 to 10 decibels, often feeling more effective than they measure.
- Screens and enclosures must be built correctly to be effective, focusing on maintaining airflow and avoiding reflection that can increase sound.
- Persistent or unusual noises like metallic clunks or loud hums require professional diagnosis to prevent damaging the unit or invalidating warranties.
Table of Contents
- What’s actually making the noise?
- Quick fixes you can try first
- Do acoustic enclosures and screening actually work?
- Can you just turn the noise down?
- When should you call a professional?
- Akita’s perspective: what actually moves the needle
- Book a noise assessment instead of guessing
- Sources
What’s actually making the noise?
Not all heat pump noise means the same thing, and knowing the difference saves you money on fixes that won’t help.
Fan noise sounds like airflow, a whooshing or whirring that rises and falls with wind conditions or defrost cycles. It’s usually the loudest component but the least likely to indicate a fault. Compressor hum is lower in pitch, a steady drone that carries through walls and floors more than through air, which is why it annoys neighbours more than distance alone would suggest. Vibration transmitted through the ground or wall mounting turns a quiet unit into a rumble felt in an adjoining bedroom, often because the mounting bracket or base was never isolated properly at installation.
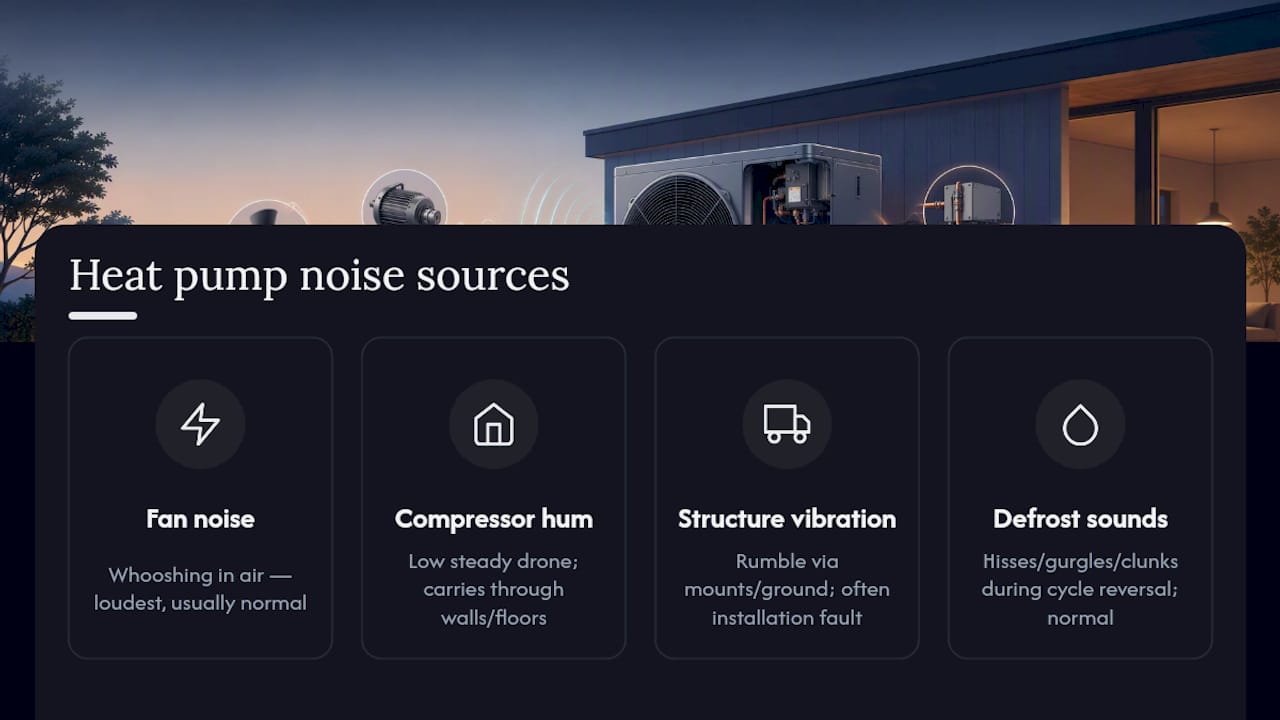
Then there’s refrigerant flow and defrost noise: hisses, gurgles, and the occasional clunk as the system reverses cycle to clear frost from the outdoor coil. These are normal, if startling the first time you hear them.
A typical modern air-source heat pump sits in the low-to-mid 40 dB(A) range at 1 metre, roughly comparable to a quiet conversation, and correct siting can keep it at levels similar to background household noise. Consumer guidance also notes that a well-installed unit produces a steady hum rather than the intermittent firing noise people associate with older combustion boilers, so if yours cycles loudly on and off, that’s worth flagging.
To locate the source: stand near the unit and listen from different angles. A rattle that changes with wind direction is usually the fan casing or a loose panel. A hum that gets worse when you press a hand against the wall behind it is vibration transmission, not airflow, and that distinction changes which fix you reach for. Our guide to air conditioning noise levels breaks down decibel scales in more detail if you want the full picture.
Quick fixes you can try first
Before booking anyone, run through this checklist. Most of it takes an afternoon and no special tools.
- Inspect the casing. Loose panels rattle. Retighten fasteners and check the manufacturer’s torque guidance if it’s listed in your manual.
- Clear debris around the fan. Leaves, moss, and garden detritus caught in the grille cause turbulence noise that sounds far worse than it is.
- Check the fan blades. A bent or damaged blade throws the airflow off balance and creates a repetitive tick or thump.
- Fit anti-vibration pads or spring mounts. These sit between the unit’s feet and the ground or wall bracket, absorbing vibration before it reaches the structure.
- Add rubber grommets to fixing bolts. Metal-to-metal contact on brackets transmits vibration directly; a grommet breaks that path cheaply.
- Check flexible connectors on refrigerant lines, where fitted, since a rigid connection can carry compressor vibration along the pipework into the house.
Compressor jackets are worth knowing about too. Manufacturer-fitted insulation around the compressor can cut noise by around 6 dB, which is a genuinely noticeable drop. The catch: retrofitting one yourself can void your warranty, so check with the manufacturer or your installer before fitting anything aftermarket.
Most of these fixes cost under £50 in parts. Vibration isolation kits typically run £20 to £80, and the dB improvement, while modest on paper (often 2 to 4 dB), tends to feel bigger in practice because it removes the low-frequency rumble that people notice most at night.
Pro Tip: If the hum gets louder when you touch the wall but quieter when you stand back from the unit, the problem is structure-borne vibration, not airflow, so no amount of trimming hedges nearby will fix it. Isolation pads will.
Our full guide to solving air conditioning noise covers isolation techniques for a wider range of units if you want more detail on mounting options.
Do acoustic enclosures and screening actually work?
They can, but only when built correctly, and this is where most DIY attempts go wrong.
There’s a real difference between a barrier and an absorber. A barrier blocks the direct line of sight between the unit and the point where the noise bothers you, forcing sound to travel around it. An absorber, meanwhile, reduces reflected energy by soaking up sound rather than reflecting it back. A solid fence panel acts mostly as a barrier; an acoustic fence with an absorptive inner face does both.
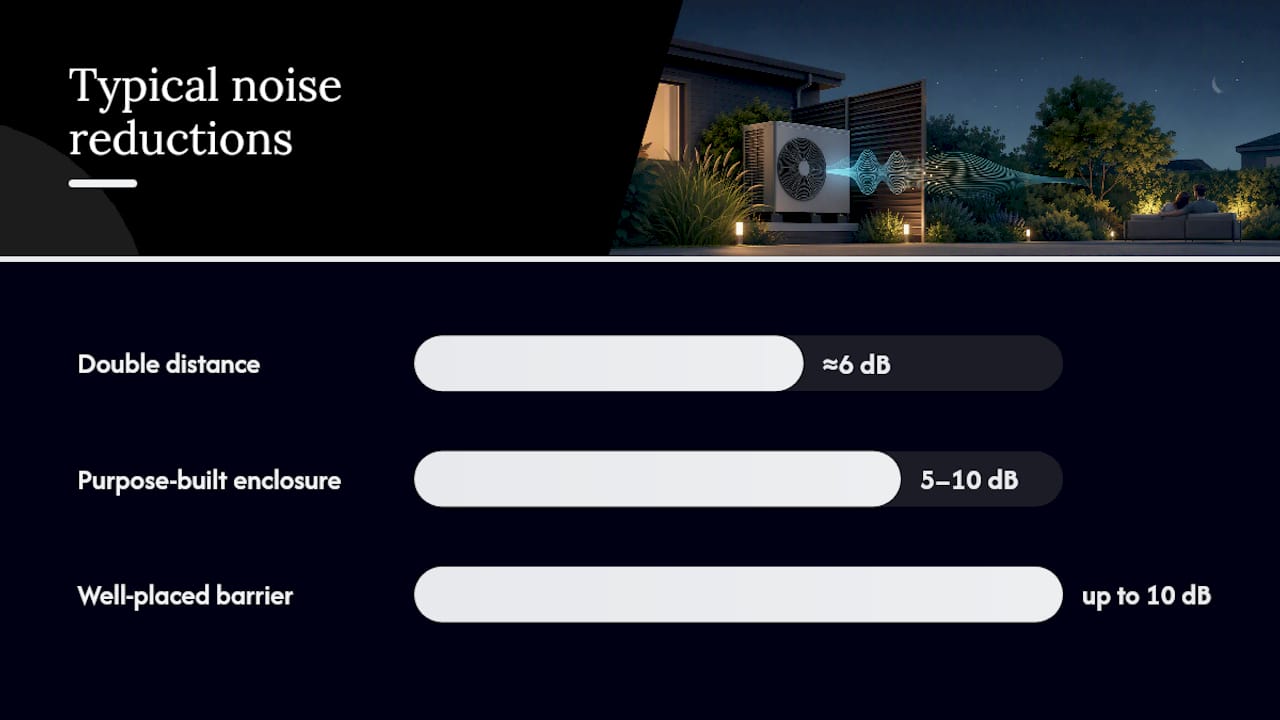
Placement matters more than most homeowners expect. Doubling the distance between the unit and the listener cuts apparent noise by roughly 6 dB, which is often a bigger win than any screening you could add. Industry guidance also notes that a well-placed barrier can contribute up to a 10 dB reduction in the noise calculation used at the planning stage.
Case studies of enclosure retrofits show measurable reductions in apparent sound level, but every design differed because the results depend heavily on how the enclosure preserves airflow and avoids creating a reflective box around the unit.
Purpose-built enclosures typically deliver 5 to 10 dB of reduction, provided they leave adequate clearance on the intake and discharge sides. That clearance figure varies by manufacturer, so check the installation manual rather than guessing.
The pitfalls are consistent across most poorly executed jobs:
- Boxing the unit in on all sides restricts airflow and forces the compressor to work harder, raising both noise and energy use.
- Reflective surfaces close to the unit (brick walls, glass, hard paving) bounce sound back rather than absorbing it, sometimes making a corner installation louder than an open one.
- Retrofitted enclosures fitted without manufacturer approval can invalidate warranty cover.
- Reduced airflow lowers efficiency, which shows up on your energy bill long before it shows up as a fault code.
Vegetation and open-slat acoustic fencing are gentler options: they soften the acoustic edge without sealing the unit in, and they double as garden screening.
Can you just turn the noise down?
To a point, yes. Most modern systems include quiet, eco, or night modes that throttle fan and compressor speed during set hours, and these settings genuinely lower noise output, though there’s a trade-off: reduced output and, in some cases, slower hot water recovery.
- Schedule noisy functions like hot-water boost or defrost cycles away from early morning or late evening hours where possible.
- Use a smart thermostat to stagger operation if you have more than one outdoor unit, so they don’t run simultaneously at peak load.
- Treat quiet mode as noise management, not a fix. If the underlying issue is a loose panel or failing bearing, throttling the fan just masks it temporarily.
Efficiency trade-offs from running in eco mode too aggressively are worth weighing against comfort. Our piece on heat pump running costs covers that balance in more detail.
When should you call a professional?
Certain symptoms are your cue to stop tinkering and book a technician.
- Metallic clunking or grinding usually points to a failing bearing or a loose internal component, not something a pad or grommet will fix.
- A sudden increase in volume after months of quiet running often means a mechanical fault, most commonly a compressor mounting issue.
- Persistent tonal hums that don’t respond to isolation measures may indicate a resonance problem tied to the unit’s structural mounting rather than surface vibration.
- Structure-borne noise inside the house that gets worse over time, rather than staying constant, suggests the original installation calculation was off.
A proper professional visit includes vibration isolation checks, an inspection of compressor mounting, and often a sound-pressure measurement taken at the boundary or nearest affected window. Installers following MCS noise-mitigation guidance document this with a site noise calculation, which accounts for distance, barriers, and reflective surfaces, and which you’re entitled to ask for. Diagnostic visits typically run somewhere between a standard callout fee and a half-day site assessment, depending on complexity; retrofit isolation work adds parts and labour on top.
Akita’s perspective: what actually moves the needle
Across the installations we see, the order of priority rarely changes: get the siting right first, isolate vibration second, keep up with maintenance third, and only reach for screening once those three are settled. Skipping straight to an enclosure without fixing the mounting underneath just boxes in the same problem.
Ask any installer for a written site noise calculation and confirm in writing whether any noise fix affects your warranty before work starts.
— Akita
Book a noise assessment instead of guessing
If you’ve worked through the checks above and the hum is still there, or you’d rather skip the trial and error, a site visit settles it properly. Professional engineers assess mounting, isolation, and placement on-site, then fix what’s actually causing the noise rather than masking it, all without putting your warranty at risk.

That might mean refitting anti-vibration mounts, relocating a poorly sited unit, or adding acoustic screening designed to preserve airflow rather than choke it. If you suspect a mechanical fault, Akita’s repair and diagnostic service covers exactly that. For homeowners planning a new system with noise in mind from the outset, our domestic installation service across Suffolk, Norfolk, and Essex builds correct siting and isolation into the quote from day one. Book an assessment and get a clear answer on what’s causing the noise, and what it takes to fix it properly.
Sources
For deeper technical detail, consult the MCS noise-mitigation guidance on siting and barriers, enclosure case studies with measured results, and this plain-English noise explainer for typical dB ranges. For indoor noise control ideas, see this noise-reducing door guide from One Day Doors & Closets.
- Mitigating Noise from Air Source Heat Pumps (MCS guidance V5)
- Heat pump noise: how loud are they really? (Retrofit Planner guide)
- Are heat pumps really noisy? What you’ll actually hear at home (The Independent)